Deploying and scaling web applications has always been a tough process. With the rise of IaaS (Infrastructure as a Service), most of the dirty job has been automated. For simple applications, deploying and scaling can be done with just a few commands.
This article walks you through the process of how to deploy AdonisJs application to Amazon Web Services (AWS) Cloud using Elastic Beanstalk. With minor modifications, it can be applied to any Node version application.
For this article, we would assume that you already have AdonisJs application that is running smoothly, locally. If that is not the case, you can find more about how to install AdonisJs here. Now when we are all set on the local machine, let’s start the AWS deployment process.
Table of contents
CLI for AWS Elastic Beanstalk
To work with AWS Elastic Beanstalk, we will use an existing Python package called awsebcli. You can install the package using pop and it comes with many built-in commands you can use.
pip install awsebcliNext, we need to confirm the package was installed successfully. We can do that by using the following command:
eb --versionCreate an IAM user
This step is applicable no matter if you are deploying AdonisJs, Python, PHP or any other type of application. Users and permissions management in AWS is critical and should always be set up correctly.
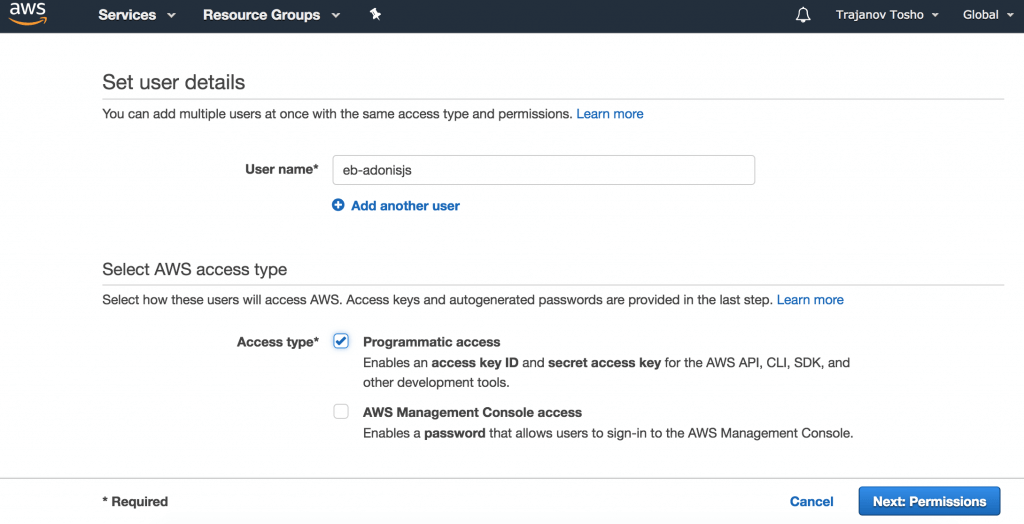
Login to your AWS account and search for the IAM console in the search bar. Select users on the menu and click add a new user.
Type whatever username is applicable, and select Programmatic access in the Access type checkbox.

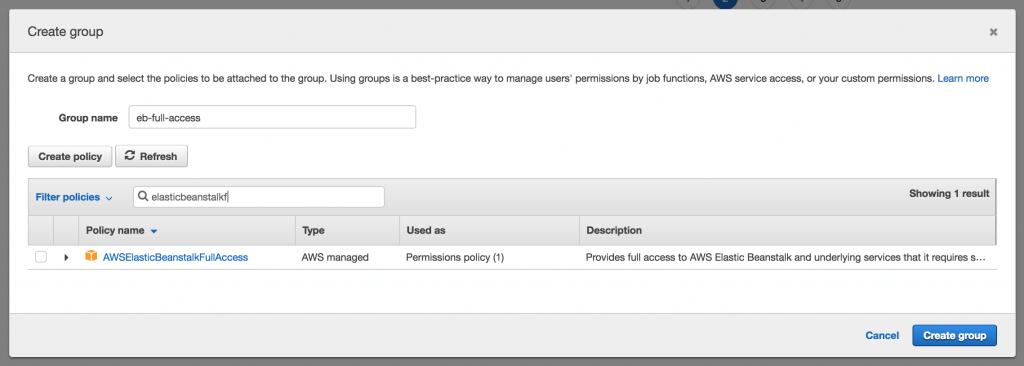
Next, you need to create a group that has AWSElasticBeanstalkFullAccess policy assigned to it. The next step is to associate the newly created group to the user we are creating.

Few steps down the road, you will get a screen that contains credentials for the newly created user. Don’t forget to download the CSV file that contains that info as we will need it when configuring the client.
Initialize Your Application
Once we install the AWS Elastic Beanstalk and create the IAM User, we need to initialize the application and create a host environment for it on AWS. In order to achieve this, from the project root directory we need to run:
eb initTo be able to complete the initialization phase, we need to go through a set of questions (all of them defaulted to certain value recommended by AWS).
Default region
The Default region name outlines the region whose servers you want to send your requests to by default. Most often, it is the region closest to you. But it can be any region from a predefined list supported by AWS.
Credentials
You need to provide your Access key and Secret key generated above so that the EB CLI can manage resources for you. Access keys are created in the AWS Identity and Access Management console.
Application name
EB CLI will default this to the directory name. You can either go with that one or type a new name for your application.
Platform
When installing AdonisJs application, this will be defaulted to Node.js.
SSH
In this step, you can create SSH keys you can use to access the environments that would be created down the road.
After a successful completion of the process, there will be a new (.elasticbeanstalk) folder created in your project. There is
Create the environment
Creating a new environment is as simple as a single EB CLI command followed by another set of questions. To run the command, we need to go to the root of the project and run:
eb createEnvironment Name
You should use a similar naming convention to what Amazon suggests. For example, application_name-env_name - especially when/if you start hosting multiple applications with AWS.
DNS CNAME prefix
When you deploy an app to Elastic Beanstalk, you will automatically get a domain name like xxx.elasticbeanstalk.com. DNS CNAME prefix is what you want to be used in place of xxx. The default probably won’t work if you’re following along because somebody else has already used it (the names are global to AWS). So pick something unique and keep on going.
Load Balancer Type
Elastic Load Balancing supports the following types of load balancers: Application Load Balancers, Network Load Balancers, and Classic Load Balancers. Amazon ECS services can use either type of load balancer. Application Load Balancers are used to route HTTP/HTTPS (or Layer 7) traffic. Network Load Balancers and Classic Load Balancers are used to route TCP (or Layer 4) traffic.
At this point, AWS Elastic Beanstalk will create and configure multiple AWS services for you. The services include EC2, S3 bucket, CloudWatch, Load Balancers, Auto Scale etc. It will deploy the application too. Be patient on this step because it takes some time (due to EC2 creation and the deployment).
Once the deployment is done, you can run the following command to display your application in the browser.
eb openViola! That will result in the following page.

Setting up ENV
A really important step in the process is configuring the .env file. You can do that by going on the interface in the Modify Software section through the Configuration tab. Or, you can use the EB CLI command (eb setenv VAR_NAME=KEY)
Running migrations on deployment
Add the following file to .ebextensions on the root of your project. Elastic Beanstalk will recognized it and take it into consideration for the deployment.
Hiring Dedicated AdonisJS Developers? Check out our AdonisJS Developers Community.


