
Custom widgets in Sitefinity CMS are designed to improve the development of controls. In addition to Sitefinity CMS built-in widgets, you can create new widgets from scratch and implement your own logic and customize widgets built-in functionality. With Sitefinity CMS, you have the option to develop widgets in both the SitefinityWebApp project or in external assemblies.
The underlying development concept is the same, but the way you organize and manage your code differs between the two methods. In this article, we will focus on MVC widgets development in SitefinityWebApp project using Sitefinity CMS version 10.2. The latest stable version is 11.2, and if you feel more curious about all its new features, you can find out more information on their official website.
It will be really useful if you are already familiar with ASP.NET MVC because the Sitefinity CMS architecture uses MVC as a design pattern that helps to achieve a good separation of concerns. You can use it to decouple:
- Model (data)
- View (user interface)
- Controller (application logic)
MVC Widget Public Properties
Sitefinity MVC Widgets would be useless if you could not control their behavior through properties. Properties in MVC Widgets behave similarly to those created using ASP.NET Web Forms. Every public property that you implement in your controller class will be shown in the Widget advanced designer.
public string Title
 {
     get;
     set;
 }
Illustration of the public property called Title, of type string.
MVC Header Widget
In this example, we’re going to create a simple header widget containing a title, a description and repeating it according to a predefined number of repetitions.
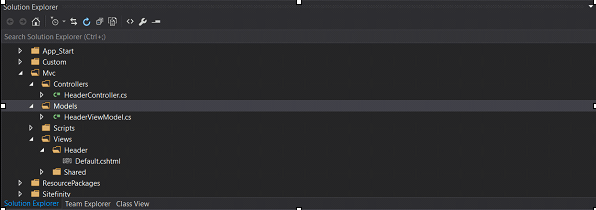
The SitefinityWebApp Project contains an MVC folder structure where you can put your own controllers, models, and views:
- MVC
- Controllers
- Models
- Views
Respectively, create the following files:
- HeaderController.cs (controller class)
- HeaderViewModel.cs (view model class)
- Default.cshtml (razor view)
Widget Controller
Once you have created the HeaderController file, place the controller code described below.
  [ControllerToolboxItem(Name = "HeaderWidget", Title = "HeaderWidget", SectionName = "MvcWidgets")]
    public class HeaderController : Controller
    {
        public string Title
        {
            get;
            set;
        }

  public string Description
    {
        get;
        set;
    }

    public int Repeat
    {
        get
        {
            return this.repeat;
        }
        set
        {
            this.repeat = value;
        }
    }

    public ActionResult Index()
    {

        var vm = new HeaderViewModel()
        {
            Title = this.Title,
            Description = this.Description,
            Repeat = this.Repeat
        };

        return View("Default", vm);
    }

    private int repeat = 1;
}
After you have implemented a HeaderController, you should register it with Sitefinity CMS. You can do this by decorating the controller class with an attribute. It should specify the section of the toolbox you want it to appear in, as well as the name of the toolbox item.
[ControllerToolboxItem(Name = "HeaderWidget", Title = "HeaderWidget", SectionName = "MvcWidgets")]Name: Defines the programmatic name of the item. This is the name used to access the item.
Title: Defines what name will be displayed for the item on the user interface.
This attribute will be automatically detected by Sitefinity CMS, and the corresponding item will be added to the Toolbox. Depending on the MVC mode that you are using in the page or template, the toolbox will either show only WebForms widgets, only MVC widgets or both.
Widget Model
Model represents domain-specific data and business logic in Sitefinity MVC architecture. So in this way, you can create a model class which you can use in Widget View.
public class HeaderViewModel
    {
        public string Title
        {
            get;
            set;
        }

        public string Description
        {
            get;
            set;
        }

        public int Repeat
        {
            get
            {
                return this.repeat;
            }
            set
            {
                this.repeat = value;
            }
        }

        private int repeat = 1;
    }
Widget View
Now we can implement the View to take the properties values of HeaderViewModel and display it. In order to access the values of this model in the view, we will add it to the view result. This is done in our Action method in the controller which returns the view that is rendered to the response and the model that is rendered by the view.
@model SitefinityWebApp.Mvc.Models.HeaderViewModel

@for (var i = 1; i <= Model.Repeat; i++)
{
    <h1>@Html.Raw(string.Format("{0} - {1}", Model.Title, i))</h1>
    <p>@Html.Raw(Model.Description)</p>
}
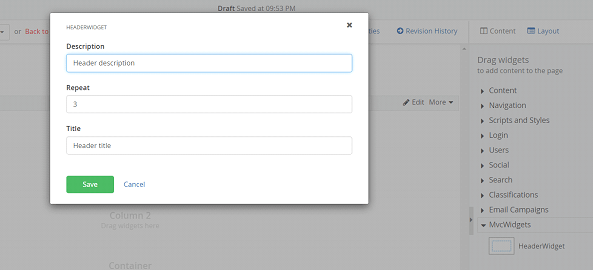
Setting up the widget
The last and easiest step is to place the custom widget to your page and setup the values in the widget designer.
Once we have completed all these steps, the output of the MVC widget should be rendered correctly. The “Widget Headers” is taken from the value we have entered in the widget designer.
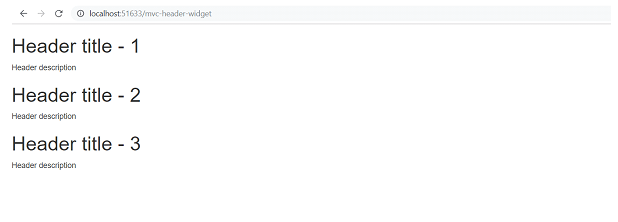
Congratulations! You have successfully done your custom MVC widget.

