
When we're starting a new project, one of the first things that comes to mind is this:
What kind of architectural pattern should I use?
The good news is the choice is vast. There's the classic MVC, VIPER, MPV, and MVVM, among others.
Let's imagine that you decided to keep the project clean and simple. You don’t want to use something so overwhelming as VIPER but want to keep a good separation of concerns of your app. You ended up going with MVVM. Amazing!
But now you've stumbled upon an issue. Even worse, the budget does not allow you to have a learning curve time.
You're in luck because, in this post, I’ll be showing you a solution that is simpler than you think and can solve your issue with a technique that you already know without breaking the bank: Delegate Pattern! (yup, the good old delegate!)
I know what you may be thinking: "With this technique, we don't have an actual reactive programming." But this is a great solution when you need to have Junior and Senior iOS software developers working on the project, as they would be able to understand more about how things work.
For the sake of this tutorial, I'll be building a simple app that shows us the list of all Yu-Gi-Oh! Cards and filters them by type. So, IT'S TIME TO D-D-D-DUEL!
MVVM
So, what is MVVM?
MVVM stands for Model View View Model. It describes the flow of our data and the separation of our concerns. The following imagery can represent it.
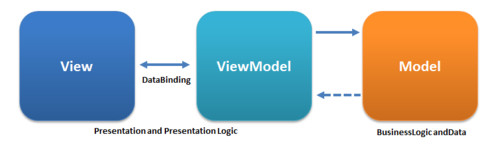
View
The View layer is responsible for handling all the layouts and displaying the data user-friendly. The View knows the ViewModel but doesn't know the model.
ViewModel
The ViewModel layer is responsible for transforming the data received in a View representative way, receiving actions from the View, dealing with our business logic. The data binding tells whoever is listening about those changes. The ViewModel Knows the Model layer but doesn’t know the View layer.
Model
The Model layer is responsible for representing the data from our business logic. The Model doesn’t know any other layer.
With that, we have a better separation of concerns on our application, making it easier for testing and later support.

App structure
We'll be building the app below, all the code is available in this repository.

I tend to set up my project structure like this:
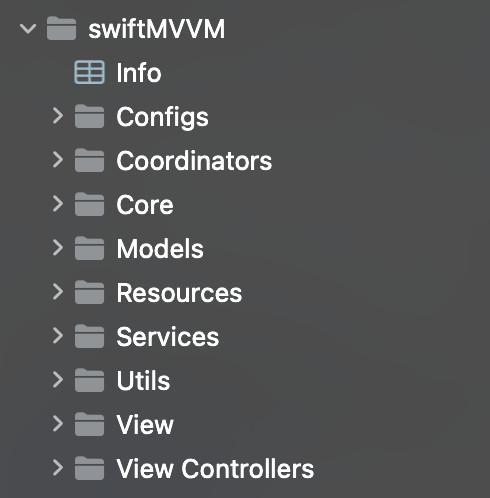
Explaining a little bit more of each one:
- Configs:
- The app environments settings, like production, staging, and development configurations, are all using the .xcconfig files.
- Coordinators:
- Using the Coordinator pattern is quite common nowadays in iOS. The coordinators help us separate the navigation logic better by removing it from our controllers.
- Core:
- Basically, the AppDelegate.
- Models:
- Where I keep all the Model Objects from the API.
- Resources:
- The project assets, launch.storyboard.
- Services:
- Where I keep the helpers, like an API Service, CoreData, UserDefaults, etc.
- Utils:
- Other helper files, such as extensions, custom errors.
- View:
- Here is where I store the View components, such as cells, custom views, buttons, etc.
- ViewControllers:
- Even the name is ViewController, here is the View Part of the MVVM. I use this name due to the UIViewControllers elements from iOS. We shouldn’t have business logic inside any controller, just UI Related code.
Step-By-Step Instructions
I like to start from bottom to top, meaning we'll be starting with the Model layer. We'll be using the ygoprodeck API.
So, let's start with mapping the models.
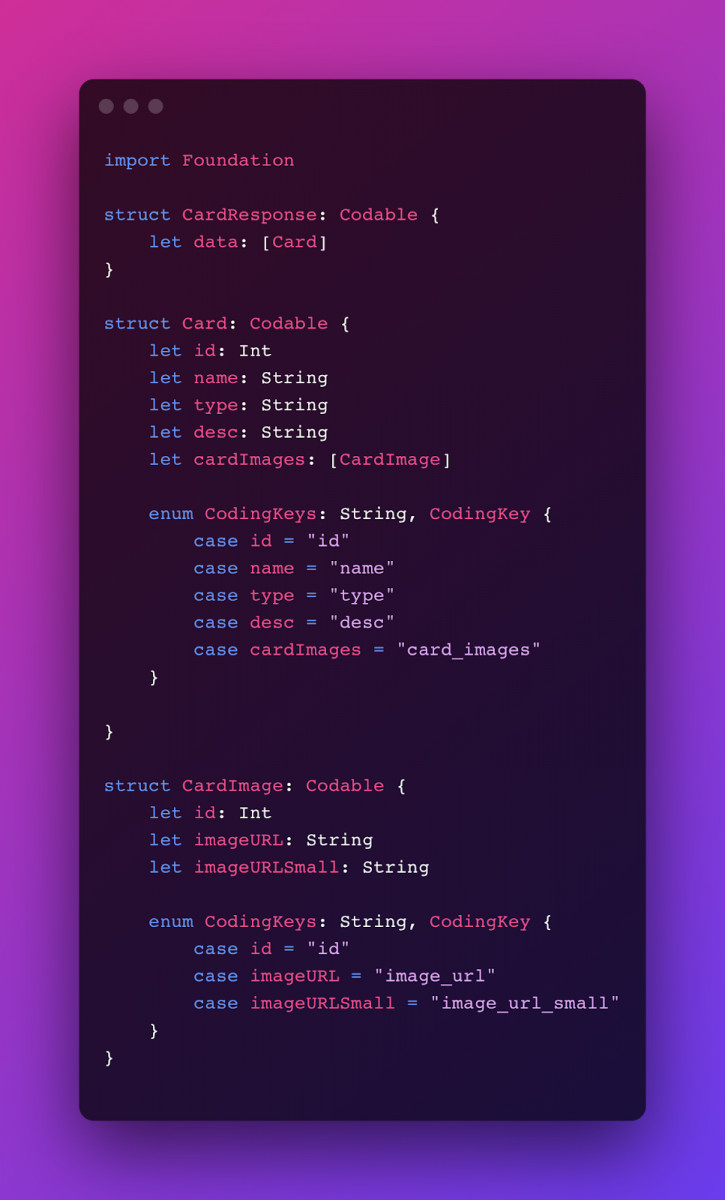
Model
We're mapping the CardResponse Object that includes a list of Card objects, and each card includes a list of CardImage objects. Sounds simple, right?
Service
To be able to retrieve this data from the API, we need a Network Layer that will make the request and either return a successful response or an error.
Let's start by mapping our Endpoints.
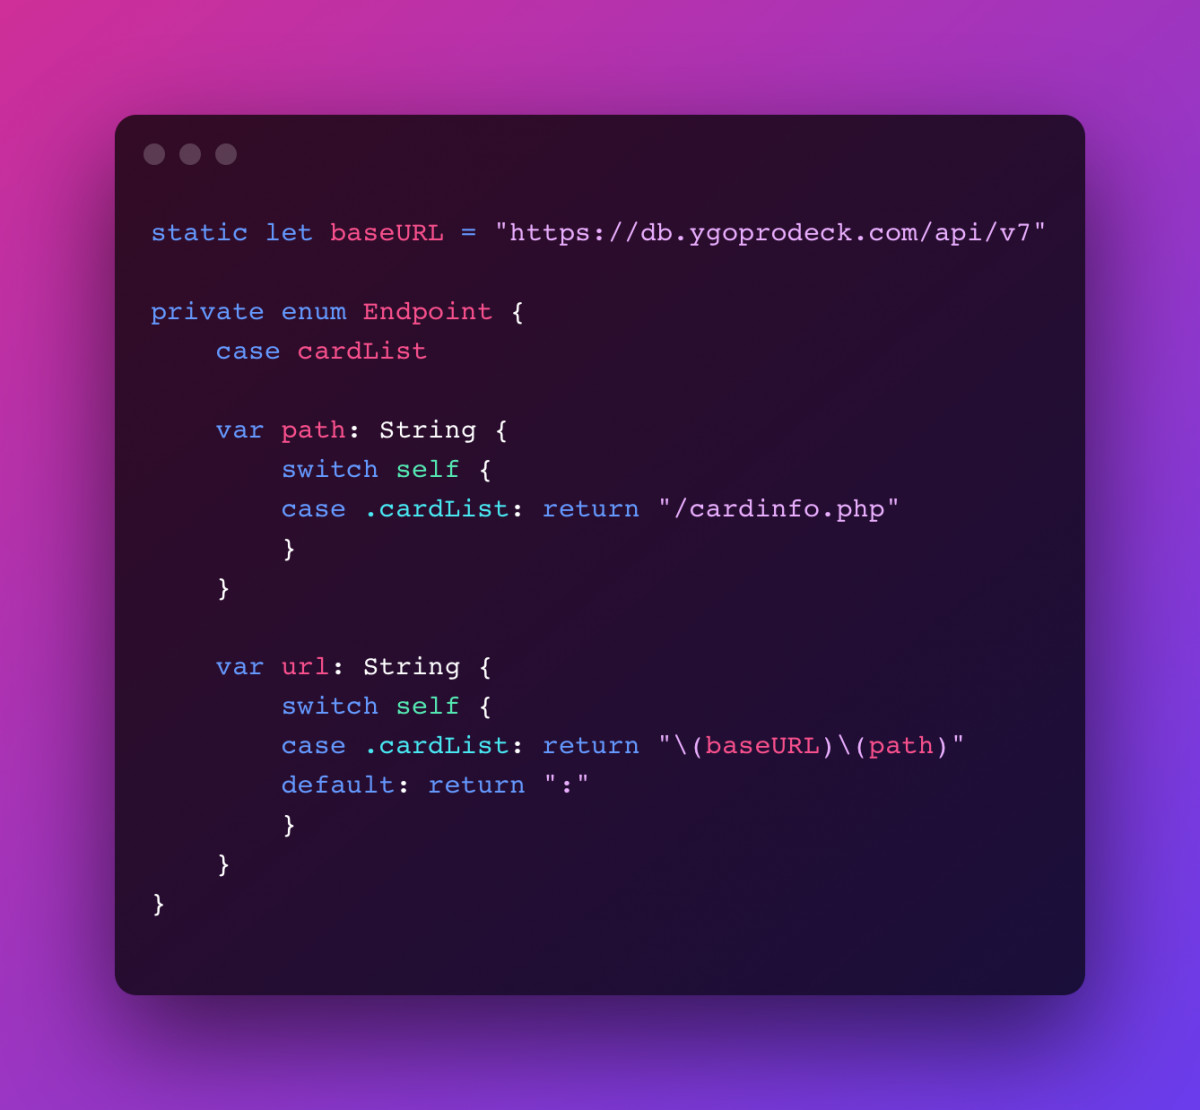
Here, we're mapping the following:
- The Base URL for all the requests.
- An Enum that will contain all the endpoints with a helper var that brings the full URL Path.
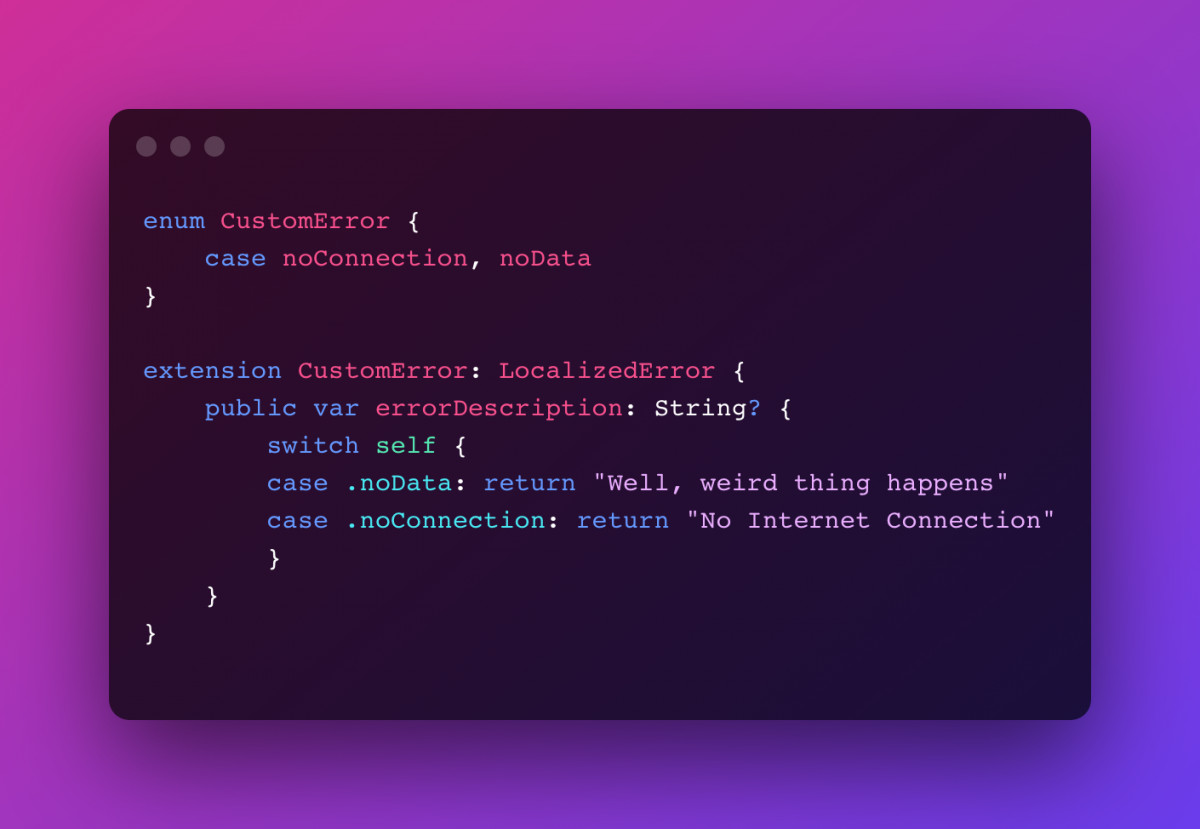
Now, let's map some custom errors. With this, we can map custom error messages for the user.
In the image below, we're mapping the request for loading the list of Cards:
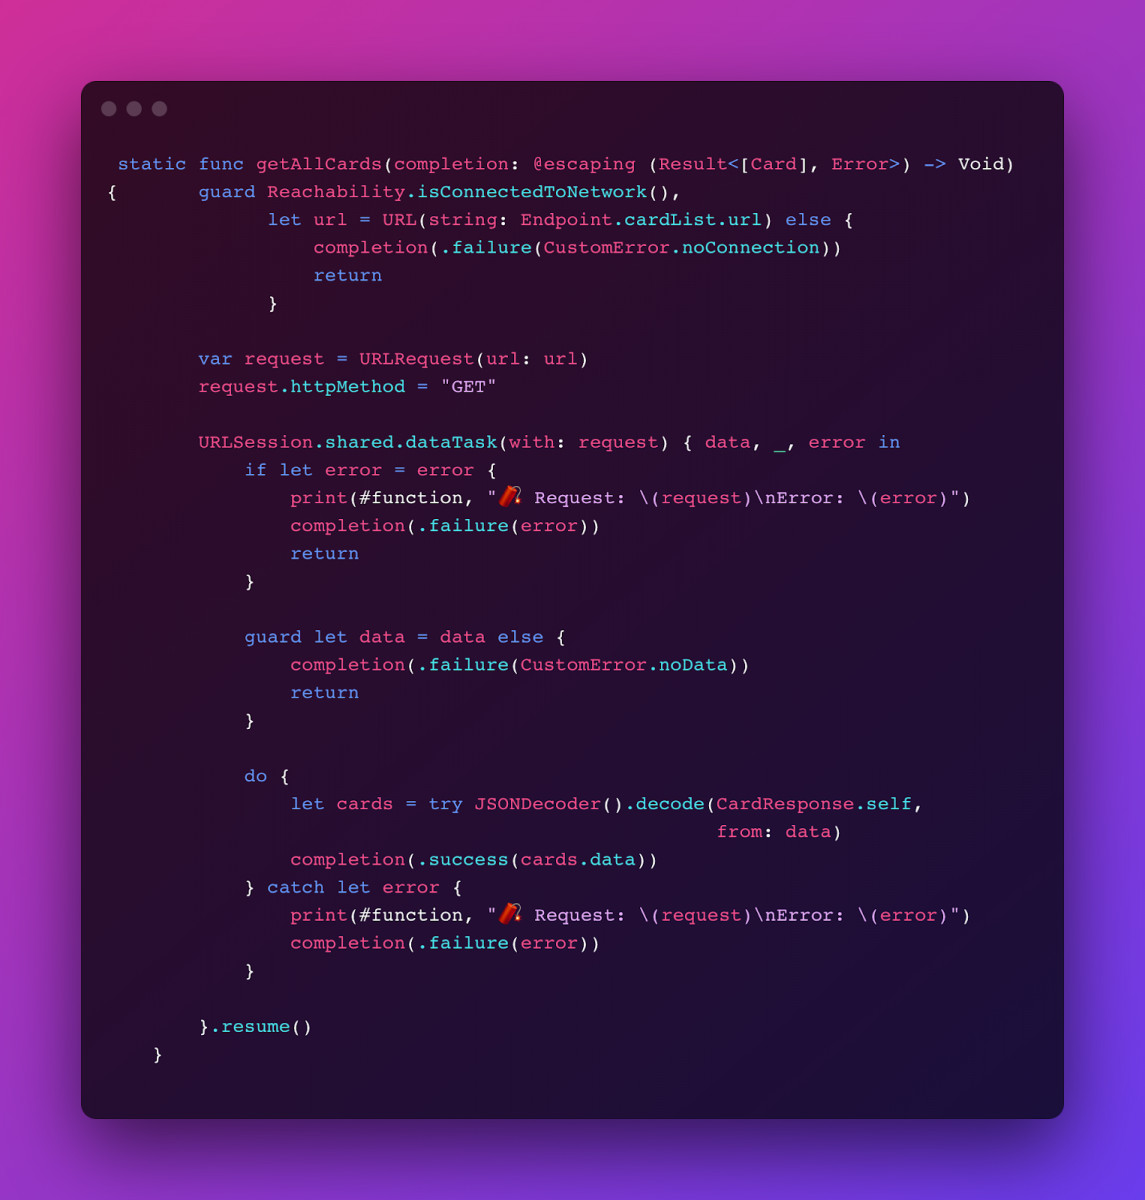
What is happening here?
- Step 1: We check if we have an internet connection and a valid URL. Otherwise, we should throw a custom error telling the user about it.
- Step 2: We create the URLRequest and set the httpMethod to GET.
- Step 3: We need to call URLSession to make the dataTask and process the URLRequest.
- Step 4: The dataTask method returns the data, status, and error object to us. We just need the data and error objects.
- Step 5: We check for errors. If we find an error, we need to throw it and finish our request.
- Step 6: We check to see if we have valid data. Otherwise, throw an error.
- Step 7: We need to convert this data to our model object. If something wrong happens, what do we do? Yes, you are right: throw an error.
ViewModel
The next step is to get this data and transform it in a View-friendly way. We start with our ViewModel.
Here is where it gets interesting. As I've mentioned, we'll not be using RxSwift or Combine. We'll use our good old friend Delegate.
But how can we make this look great?
Firstly, I like to create an enum that represents the current View State:
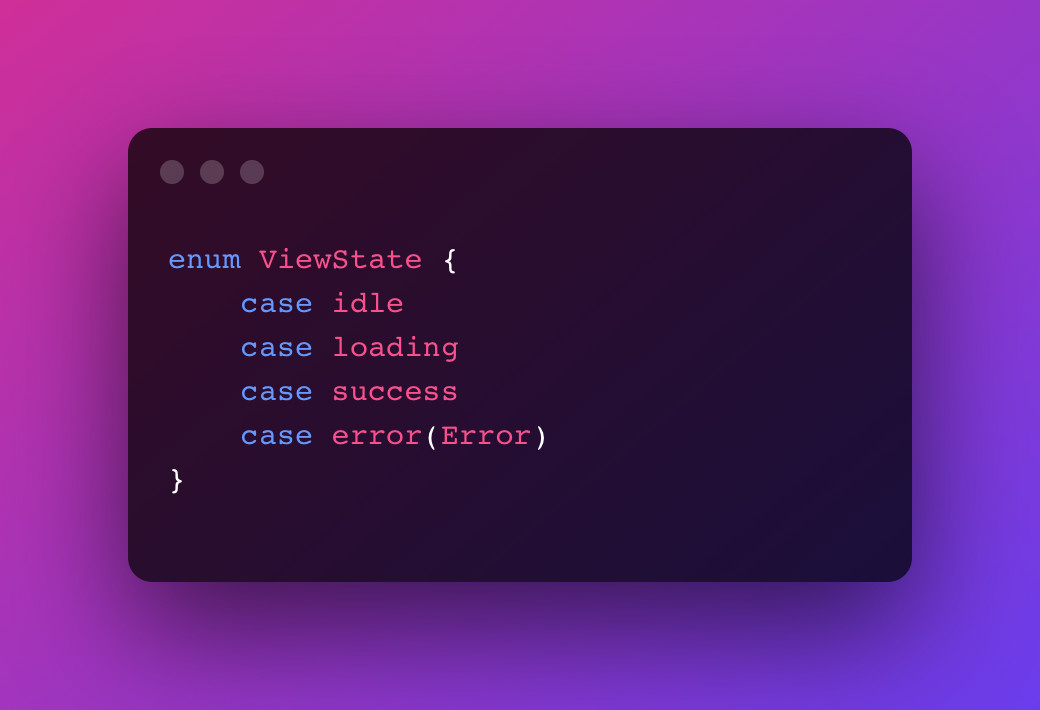
It's pretty straightforward. Our View can have these four possible states, idle, loading, success, and error, self-explanatory.
Now we need to map our base protocol for use as our delegate.
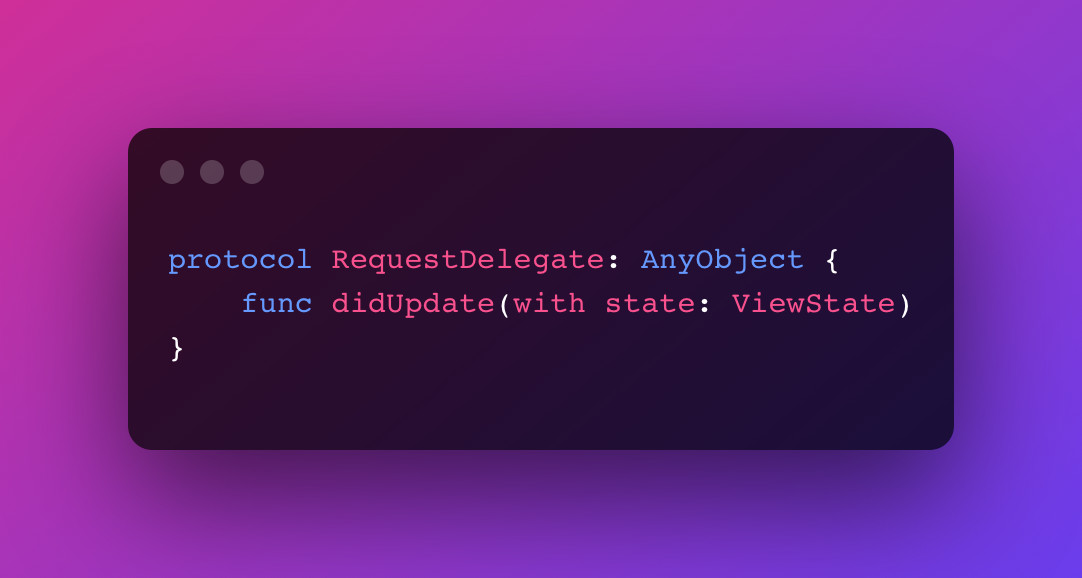
We just need to let our View know that we have updated our state.
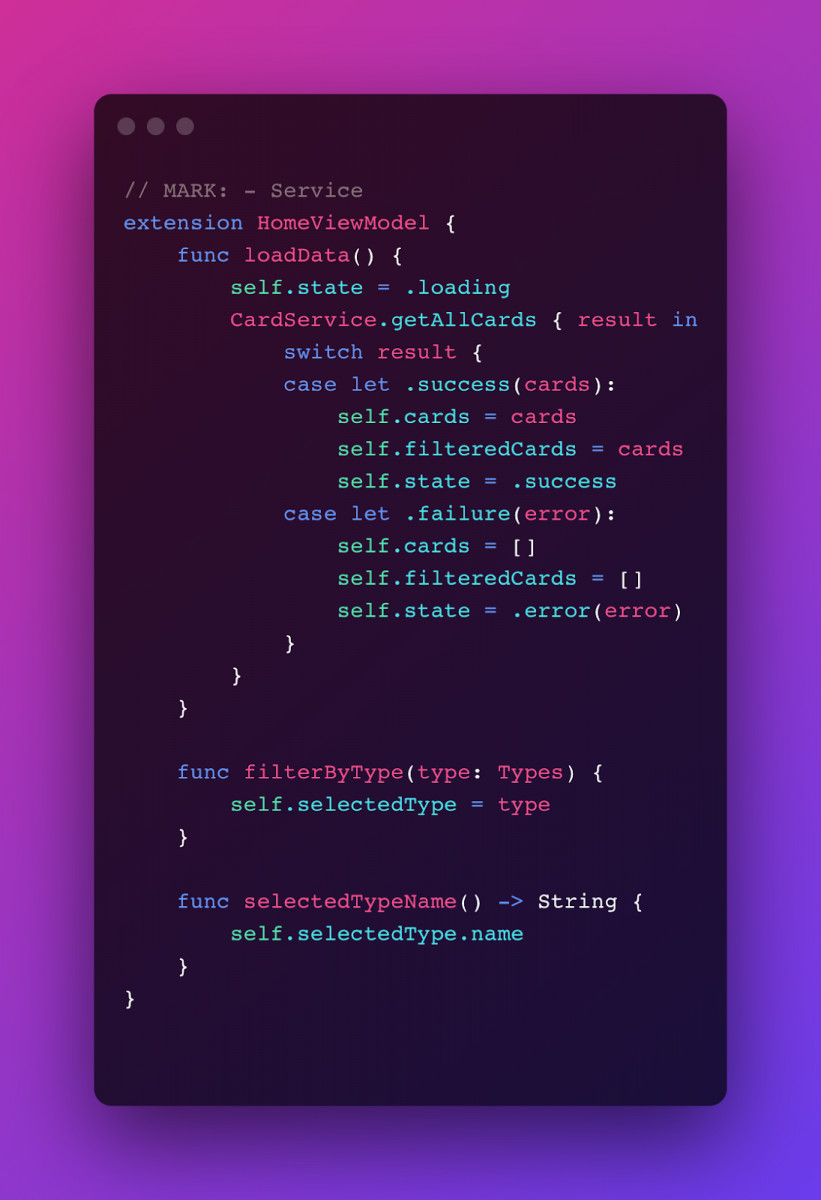
Now let's start implementing our ViewModel!

Here are the step-by-step instructions:
- We create a weak var for holding our delegate (avoid memory leaks).
- We configure a didSet on our state property, so every time its value is changed, it will trigger the delegate didUpdate method.
- We store our list of cards.
- We have a filtered version of our list.
- We hold the current filter type select, also with the didSet to trigger the filterData method.
- On the init, we set our state to idle.
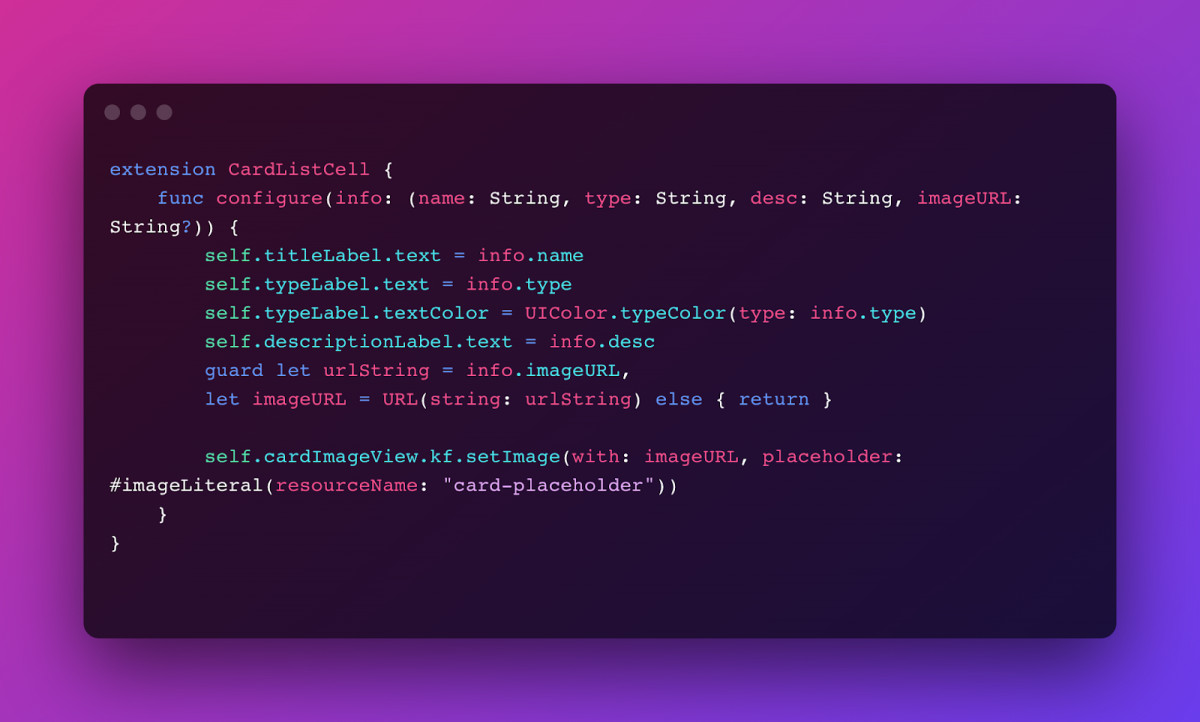
I like to let extensions separate things. Here we have the DataSource provider, which will provide info for the View, such as the number of items and the info to be displayed in a View-friendly way.

Here are our services and logic methods, organized in:
- loadData
- We set our state for loading, and we call the CardService for getting the cards from the API.
- After getting the result, we map either success or failure. Based on the result, we set the values on our properties and set a new state.
- filterByType
- This method sets the selectedType property based on an action from the View.
- selectedTypeName
- Method to provide the currently selected type name will make sense on the View part.
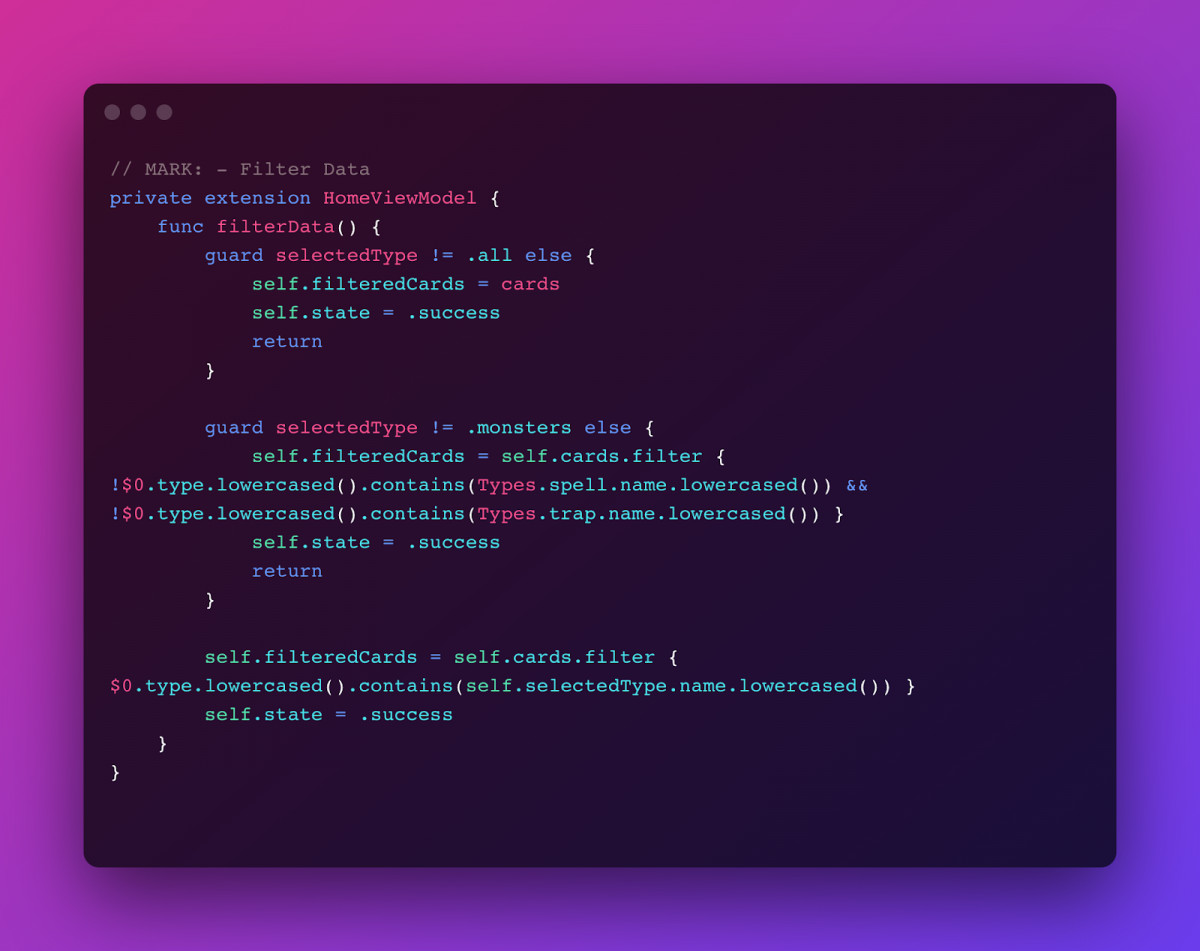
The image below shows our filter logic:
- This method is a simple local filter that checks for keywords inside the Type and filters the cards array based on that.
View
It's time to go over the View part. I will not dive so much into the layout creation—let this be for your internal Picasso, as you can do the UI as you wish.
I'm using SnapKit for creating the layout.
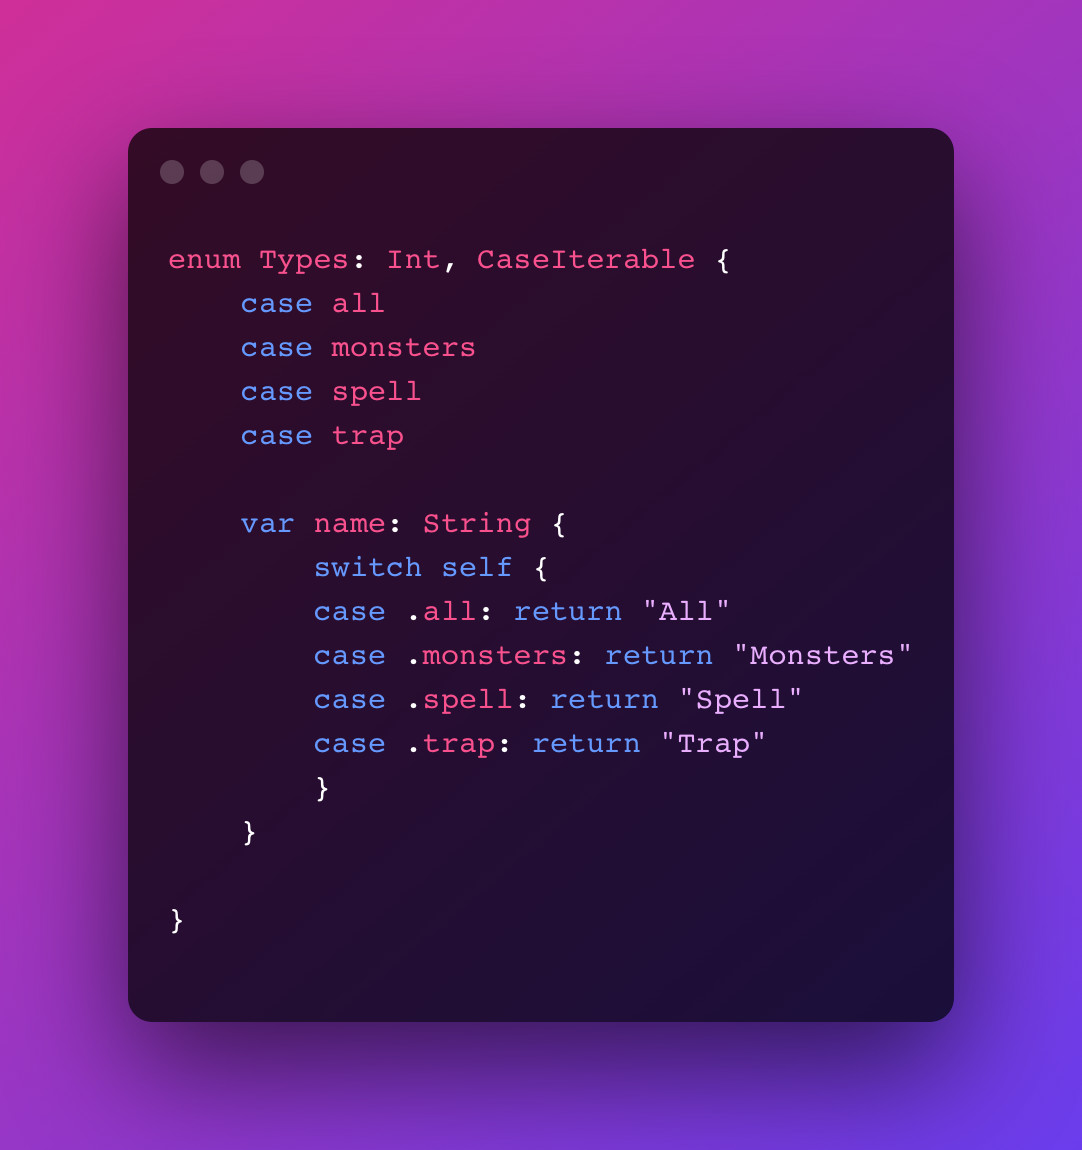
I've created an enum to help set the Types for the Segmented control to pass it to the ViewModel and filter properly.
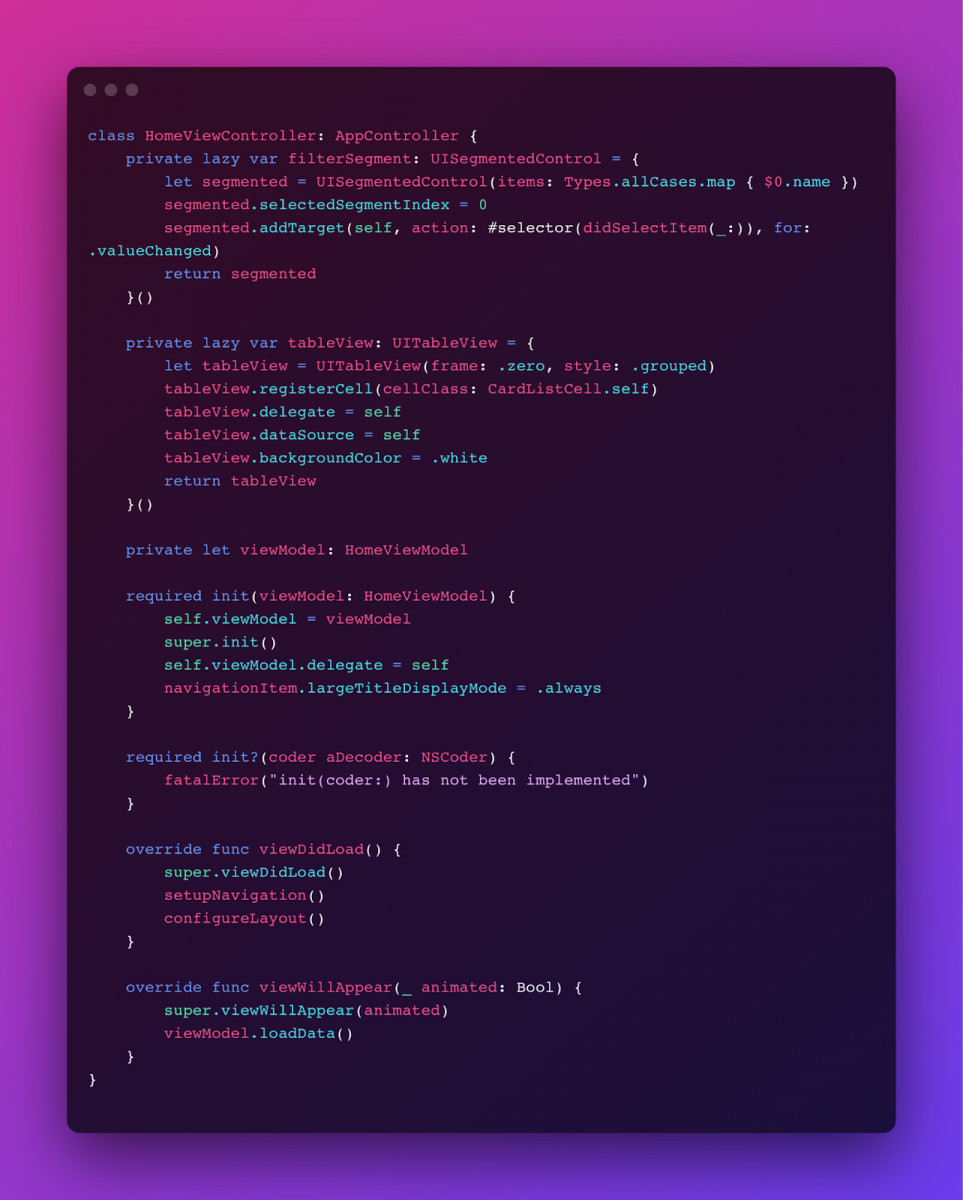
On our ViewController, I'm setting up the UI properties and the ViewModel property.
We receive the instance of the ViewModel through our init method and sign its delegate. This approach makes it easier to inject a modified version of the ViewModel for testing purposes.
On the ViewDidLoad method, we call the methods for setting up the constraints, and on the ViewWillAppear, we ask our ViewModel to load the data.
Setting up the constraints:
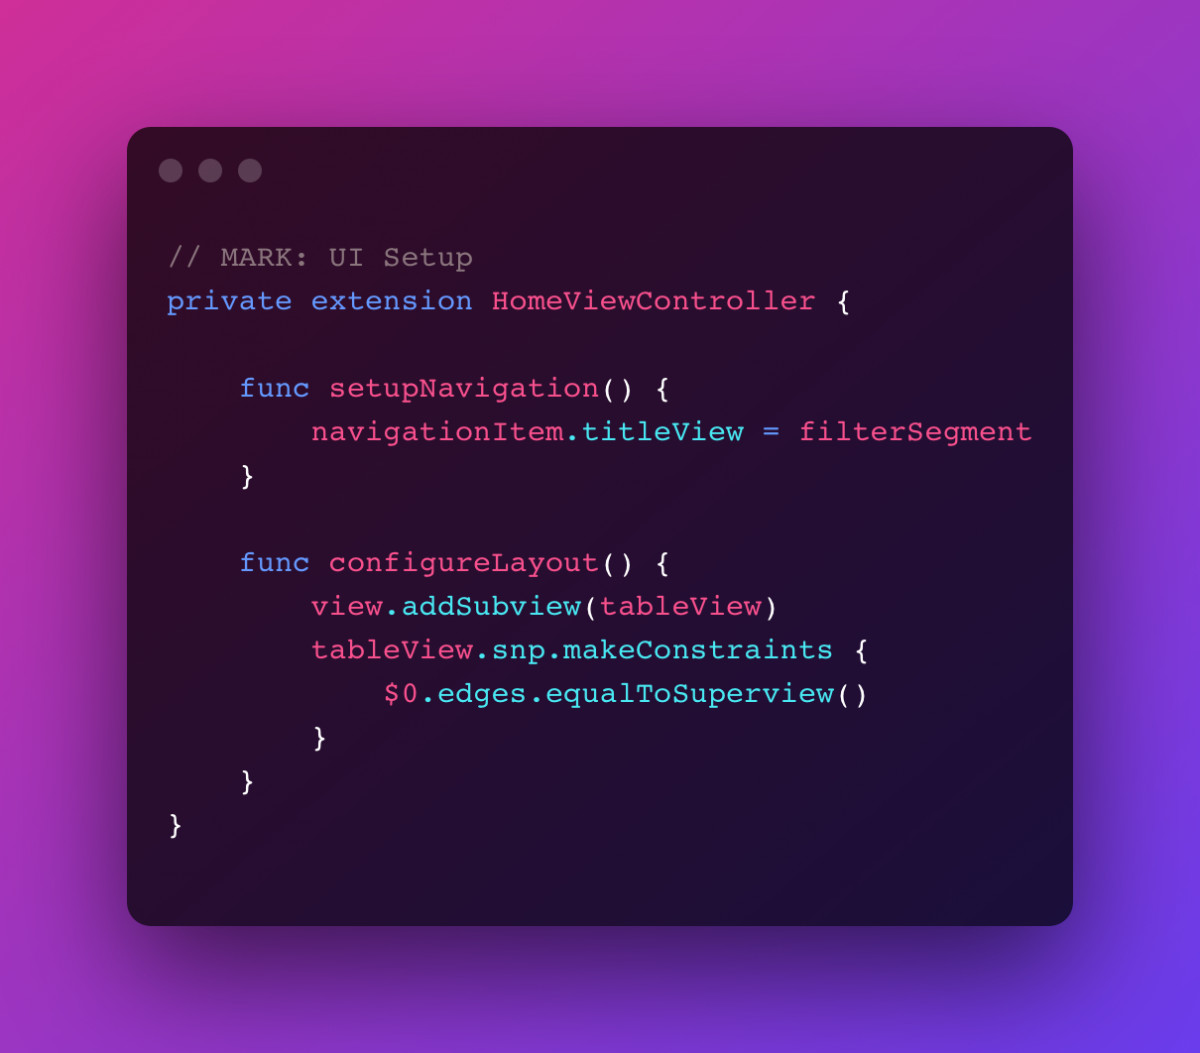
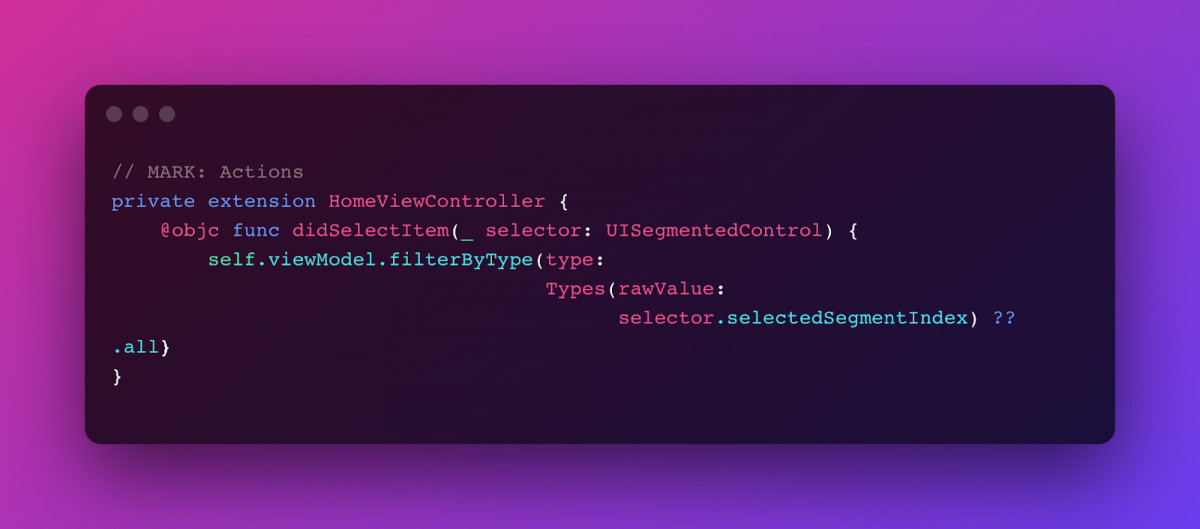
Setting up the segmented control select action, we ask your ViewModel to filter based on the selection.
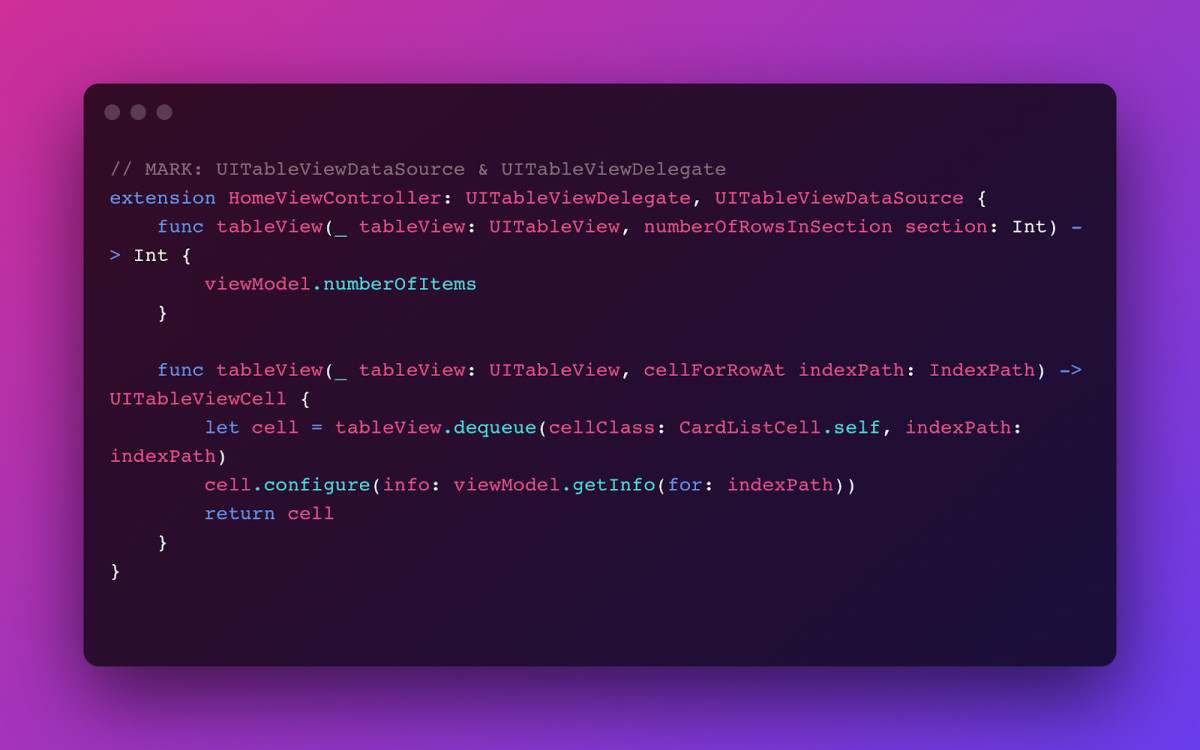
Now let's set up our UITableView DataSource & Delegate.
On the number of rows, we ask our ViewModel for the number of items, and in the cell builder, we ask for the info and pass it to our cell.
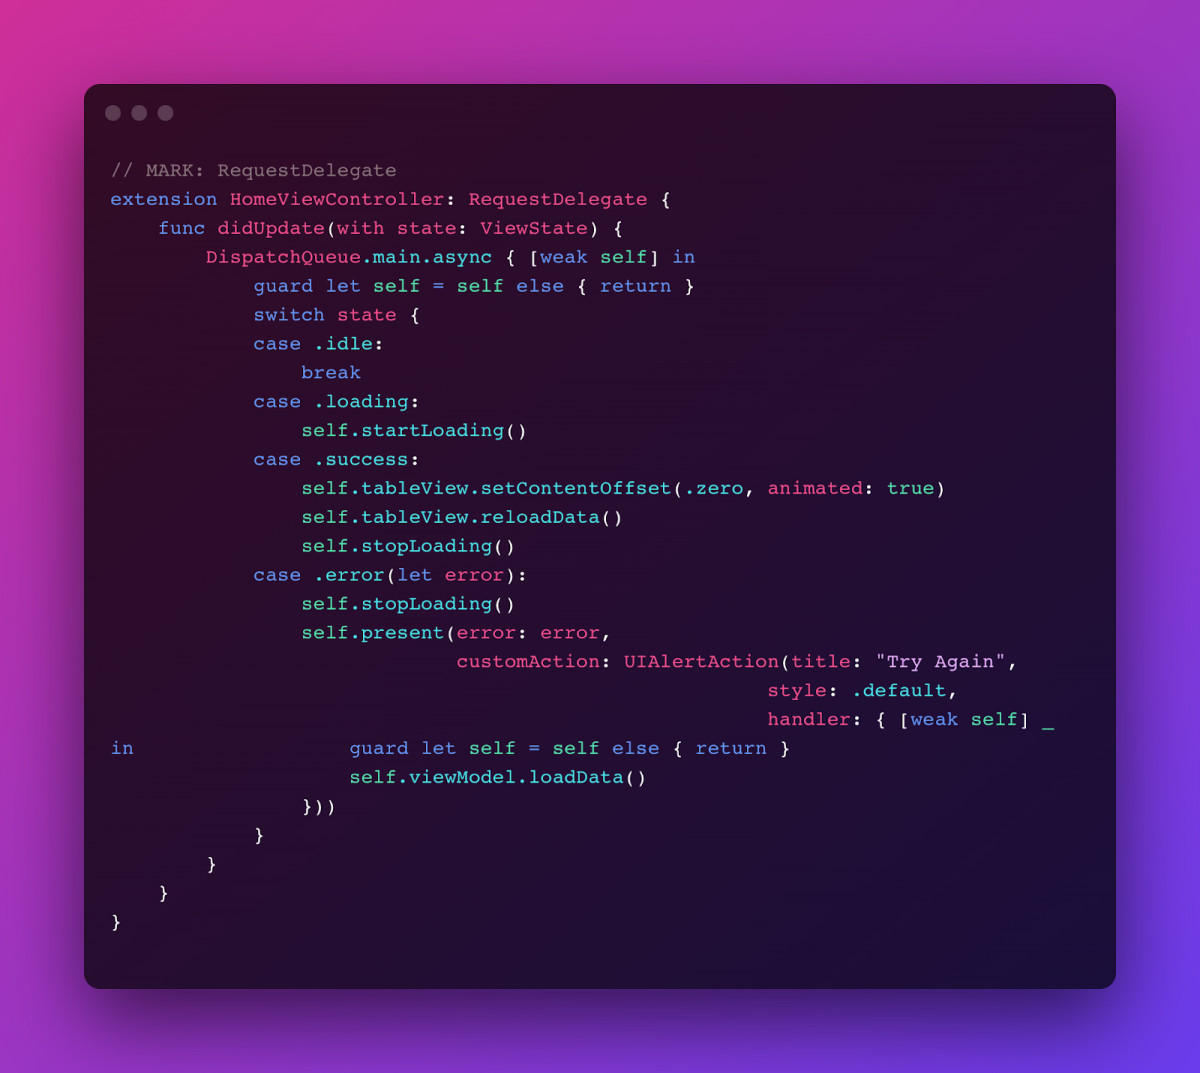
You might be asking: "How am I supposed to update the UI to show loading display errors?"
This is where the magic happens. We'll listen to our delegate and get the current state.
We can draw our View based on our state:
- Idle: Do nothing
- Loading: Show loading
- Success: Reload data
- Error: Show error
As simple as that, we now have a complete app with MVVM without the complexity of other data-binding approaches.
Final Word
You've reached the end of this article! We learned we can have a pretty clean architecture on our app without increasing the complexity to make sure every team member feels comfortable working on the project while improving it. We've also increased the testability of our project due to a better separation of concerns.
Hope you enjoyed reading the post and good luck with what you're building!
