
In this post, we'll look at the basics of OpenAPI and see the main reasons for using it. We'll also explore its principal benefits and then look at a practical example of open API specification with Spring Boot to make things easier to understand.
Let's dive in!
Table of contents
What Is OpenAPI?
The answer to what is openAPI specification is simple - OpenApi is a specification that was previously known as Swagger Specification, and it aims to describe the API format by defining a standard, language-independent interface to RESTful APIs. Without access to the service's source code or documentation, both humans and machines can know and understand what kind of capabilities the service provides and the purpose of each defined endpoint.
When a remote service is adequately specified, a user with minimal implementation logic can understand and interact with it. The API can then be displayed using an OpenAPI definition by tools that generate documentation and code to create servers and clients in different programming languages.
Why Should You Use OpenAPI?
The OpenAPI Specification Spring Boot can assist you in developing consumer-centric APIs. Before we start any development at all, we need to have the endpoint neatly defined in detail, such as:
- What should it receive as a request body, or what path parameters or query parameters are needed;
- What would the response body look like;
- What are the possible exceptions that would be returned;
In summary, it should represent the responsibility of that endpoint both from a business and development perspective.
This represents that design should be first defined and ready before any kind of development. In order to achieve that, the Swagger Codegen is used to produce a server stub for the defined API, and all that remains is to implement the server logic, test it, and your API is ready to go to production.
Swagger Codegen can produce client libraries for your API in over 40 languages. We are going to use Java as an example. Also, Swagger UI can be used to produce interactive API documentation that allows your users to test API calls right in the browser.
Benefits of OpenAPI
One of the major open API benefits is reduced reliance on separate teams working on your API, such as the front-end and back-end teams or the architects, tech writers, and QA.
This is because the API description puts various stakeholders on the same page about what the API is designed to achieve and how it relates to their job functions. It serves as a contract between the API's intended service and its functionality, allowing them to communicate more easily.
The collaborations between teams in one organization will be faster since all the dependencies are being removed. Once the specification is ready, the front-end teams will be able to continue working independently on the defined endpoints since they got all the required information without waiting for the back-end team to finish the implementation logic on the server side.
Also, QA can now use the defined specification to start writing their automation tests. Everyone would be working independently at the same time, which can lead to faster delivery to production. Let's move on to the openAPI Spring example.

OpenAPI Practical Example
It's time to begin our openAPI specification Spring Boot example, so let's get into it. For the sole purpose of demonstrating how OpenApi works in practice, we will create a simple specification that will represent a library service. The endpoint we'll demonstrate will be to take a book from the database by its unique identification book number ISBN (The International Standard Book Number). Note that OpenAPI specification can be written in YAML or JSON.
paths:
  /client-api/v1/books/{isbn}:
    summary: Library
    description: Calls for interaction with the library.
    parameters:
      - name: isbn
        in: path
        description: The isbn of the book
        required: true
        schema:
          type: string
        examples:
          example:
            summary: AT483200000012345864
    get:
      tags:
        - Library
      summary: "Get book by given isbn"
      description: "# Get specific book - `GET`\r\n\r\n \
                  \ Get a book by its isbn.
                  "
      operationId: getBookByIsbn
      responses:
        "200":
          description: Book by provided iban retrieved successfully.
          content:
            application/json:
              schema:
                $ref: '#/components/schemas/BookDetails'
              example:
                id: "123e4567-e89b-12d3-a456-426614174000"
                title: "Clean Code: A Handbook of Agile Software Craftsmanship 1st"
                isbn: "9780132350884"
                author: "Robert C. Martin"

        "403":
          description: Forbidden
          content:
        application/json:
              schema:
                $ref: '#/components/schemas/ForbiddenError'
        "404":
          description: NotFound
          content:
            application/json:
              schema:
                $ref: '#/components/schemas/NotFoundError'
First, we define the path of the endpoint with the path parameter for ISBN along with its type and the HTTP method; in this case, that is GET.
If we want, we can provide an example for the path parameter, it is recommended for clarity, but it's not mandatory. The tags keyword represents the name of the interface that will be generated out of this specification (we'll look at that later). It is also a good practice if the controller name contains the name of the tag; for example, if the tag name is Library, the controller that implements the generated Library interface should be named LibraryController.
We need to provide some description for documentation purposes. The name of the interface method is defined in operationId. In this case, the method will be called getBookByIsbn. In the responses part, we define all the responses that this endpoint can return, 200 OK for a successful response, 403 Forbidden, and 404 NotFound.
We have the freedom to define the structure of our responses in the components/schemas path, which is defined in the same file and looks like this:
components:
  schemas:
    BadRequestError:
      type: object
      description: Bad Request Error
      properties:
        errorCode:
          type: string
          description: Error code
        errorMessage:
          type: string
          description: Error Message
    NotFoundError:
      type: object
      description: Not Found Error
      properties:
        errorCode:
          type: string
          description: Error code
        errorMessage:
          type: string
          description: Error Message
    ForbiddenError:
      type: object
      description: Forbidden Error
      properties:
        errorCode:
          type: string
          description: Error code
        errorMessage:
          type: string
          description: Error Message

    BookDetails:
      type: object
      description: Consent details
      properties:
        id:
          type: string
          description: Book Id
        title:
          type: string
          description: Book Title
        isbn:
          type: string
          description: Book's isbn
        author:
          type: string
          description: Book's author
As we can see, the response entity for the 200 OK is defined here, BookDetails, along with the ForbiddenError 403, BadRequestError 400, and NotFoundError 404, having the structure that we choose according to our needs. For all available types for defining properties in OpenAPI, you can read the official documentation.
The generated interface from this specification is the following:
@Validated
@Api(value = "Library", description = "the Library API")
public interface LibraryApi {

    /**
    * GET /client-api/v1/books/{isbn} : Get book by given isbn
    * # Get specific book - `GET`      Get book by its isbn.
    *
    * @param isbn The isbn of the book (required)
    * @return Book by provided iban retrieved successfully. (status code 200)
    *         or Forbidden (status code 403)
    *         or NotFound (status code 404)
    */
    @ApiOperation(value = "Get book by given isbn", nickname = "getBookByIsbn", notes = "# Get specific book - `GET`      Get book by its isbn. ", response = BookDetails.class, tags={ "Library", })
    @ApiResponses(value = {
        @ApiResponse(code = 200, message = "Book by provided iban retrieved successfully.", response = BookDetails.class),
        @ApiResponse(code = 403, message = "Forbidden", response = ForbiddenError.class),
        @ApiResponse(code = 404, message = "NotFound", response = NotFoundError.class) })
    @RequestMapping(value = "/client-api/v1/books/{isbn}",
        produces = { "application/json" },
        method = RequestMethod.GET)
    ResponseEntity<BookDetails> getBookByIsbn(@ApiParam(value = "The isbn of the book",required=true) @PathVariable("isbn") String isbn);

}
After this is generated, we can now continue with our implementation of the logic for this endpoint by implementing this interface to our already defined controller:
@RestController
public class LibraryController implements LibraryApi {

    @Override
    public ResponseEntity<BookDetails> getBookByIsbn(String isbn) {

        // TODO - implementation goes here....
        return null;
    }
}
As per the maven plugin setup, it can be adjusted to match your project needs; here is one example:
<plugin>
        <groupId>org.openapitools</groupId>
        <artifactId>openapi-generator-maven-plugin</artifactId>
        <version>${openapi-generator.version}</version>
        <executions>
          <execution>
            <id>generate-client-api-code-example</id>
            <goals>
              <goal>generate</goal>
            </goals>
            <configuration>
              <output>${project.build.directory}/generated-sources/</output>
              <generateSupportingFiles>true</generateSupportingFiles>
              <generatorName>spring</generatorName>
              <strictSpec>true</strictSpec>
              <generateApiTests>false</generateApiTests>
              <generateModelTests>false</generateModelTests>
              <inputSpec>
                ${project.build.directory}/specs/open-api-client-v1.yaml
              </inputSpec>
              <configOptions>
                <library>spring-mvc</library>
                <dateLibrary>legacy</dateLibrary>
                <interfaceOnly>true</interfaceOnly>
                <skipDefaultInterface>true</skipDefaultInterface>
                <useBeanValidation>true</useBeanValidation>
                <useClassLevelBeanValidation>true</useClassLevelBeanValidation>
                <useTags>true</useTags>
                <java8>true</java8>
                <useOptional>false</useOptional>
                <apiPackage>com.open.api.ad.rest.client.api</apiPackage>
                <modelPackage>com.open.api.ad.rest.client.model</modelPackage>
              </configOptions>
            </configuration>
          </execution>
        </executions>
      </plugin>
You can find more information about the properties and openAPI specification generator on their official GitHub repository site.
This configuration generates the API along with its model that we defined in the specification:
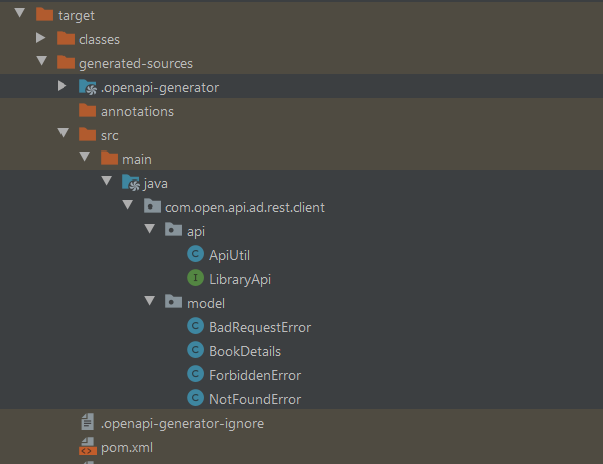
From this point on with the openAPI Spring Boot, we are all set for development; back-enders can continue with their work on the back-end logic; the same applies to the front-end developers and QA testers.
Closing Notes
It is very straightforward to create APIs using OpenAPI Specification. It is a development-driven approach with a centralized API that both humans and machines understand.
It supports over 40 languages, and it's language-independent. It speeds the development cycle of an application by reducing the dependencies between teams, making going to production faster.
Through a definition-driven approach, the OAS assists you in creating APIs that meet the demands of your prospects while also providing a decent developer experience.
Thank you for reading this openAPI specification tutorial and good luck!
