
Astro is a relatively new and modern web framework for building performant and content-focused websites. This is the official statement of the framework - but what does it actually mean? Well, in this article, we’ll dive into Astro and its next-gen frontend architecture (Astro Islands) that can help us optimize websites to load ~30% faster by reducing the amount of JavaScript loaded on the webpage. This feature alone makes it stand out from its competitors, which (due to hydration) tend to send large chunks of JavaScript on initial page load.
In a way, Astro is bringing back the simplicity of the old web and the ability to integrate powerful frameworks such as React, Svelte, Vue, Preact, etc.
Why Should I Use Astro?
To be honest, there are many frameworks (like Next.js, Gatsby, etc.) that offer similar features and will do the trick in most use cases. However, there is one key feature that makes Astro stand out - its island architecture! This enables it to serve static HTML content by default without the extra JavaScript bloat needed for hydration. Well, it's not just that - here are some features that make Astro unique:
- Is framework agnostic, meaning you can write your components in React, Svelte, Vue, Solid, Preact, etc.;
- Uses the island architecture and partial hydration-making it perfect for optimized and performant client-side websites;
- Content collection API for managing collections of extended markdown files;
- Has a growing list of integrations libs (tailwind, lottie, etc.);
- It is supported by some big players like Netlify, Vercel, and Storyblocks;
- Already winning awards (StackShare awards for top developer tools of 2022);
Framework Agnostic
Do you have a React component library with styled components good to go? Or, perhaps you’d like to learn Svelte and recreate your portfolio page? Well, Astro can be quite useful in both of those cases. Components from any framework or library that you end up using will be compiled into plain HTML - making your website fast and SEO-friendly. Astro has a growing list of frameworks and libraries that you can use in your Frontend.
On top of that, Astro has a great templating language called .astro that is quite easy to learn and use.
Island Architecture
When you search for Astro, the first thing that pops up is the Island Architecture. What this actually means is that Astro follows a pattern called Astro Islands, which is a new way of organizing your apps. The idea was introduced in 2019 by Katie Sylor-Miller (Frontend Architect @ Etsy).
Since most components in modern SEO-friendly websites are non-interactive and don’t require any client-side JavaScript for interactivity, Astro compiles them into plain HTML that is served directly to users. Each component on the page is considered an “island” and, by default, is not interactive — meaning any JavaScript logic you have in it won’t execute directly.
Components that are interactive and require execution of client-side JavaScript are saved for individual (partial) hydration once the plain HTML is served and rendered. Since we are only loading JavaScript for those specific components, the bundle size of the JavaScript loaded is significantly reduced, making the whole page more performant.

Content Collection API
Content collections in Astro are the best way to work with Markdown and MDX and organize your content. Collections can help you organize your blog posts (content), validate your frontmatter, and provide automatic TypeScript type-safety for all of your content.
They basically allow us to organize our content into folders that can be easily accessed via an API or from within the UI. You can also add a description for each collection, so you'll know what's inside each folder without having to open it up first.
Setting up Astro
Getting started with Astro is quite easy. Before creating a new Astro project, make sure you have Node.js (v16.12.0 or higher) installed on your machine. Then, open your terminal of choice and type the following command:
npm create astro@latestOr, if you prefer, `yarn`:
yarn create astro
This will start the Astro CLI wizard that will guide you in creating your first Astro project. You can run this command anywhere on your machine - you don’t have to worry about creating a new empty directory before you start the process. If you don’t have create-astro installed, it will prompt you to set it up on the first run. Otherwise, the wizard will ask you where it should create the new Astro project. Make sure to tick off the “Include sample files” option if this is your first Astro project - it will help you to understand Astro folder structure and how everything works within it.
Please make sure to install the dependencies before continuing - the wizard will automatically ask for this, but you can choose to install them manually if you wish.
Starting Astro Development Server
Once you have created your Astro project, you can start the development server by typing the following command in your terminal (in your project folder):
npm run devOr, if you prefer `yarn`:
yarn run devThis command will start the Astro dev server on port 3000. Make sure the port is free, and no other dev servers are running on the same port before running the previous command. If everything is installed properly, you should be able to see the default Astro help screen by navigating to http://localhost:3000.
Folder Structure
The initial Astro folder structure might differ depending on the options you select when creating your project. If you select “Include sample files” and TypeScript your Astro project folder structure will look like this.
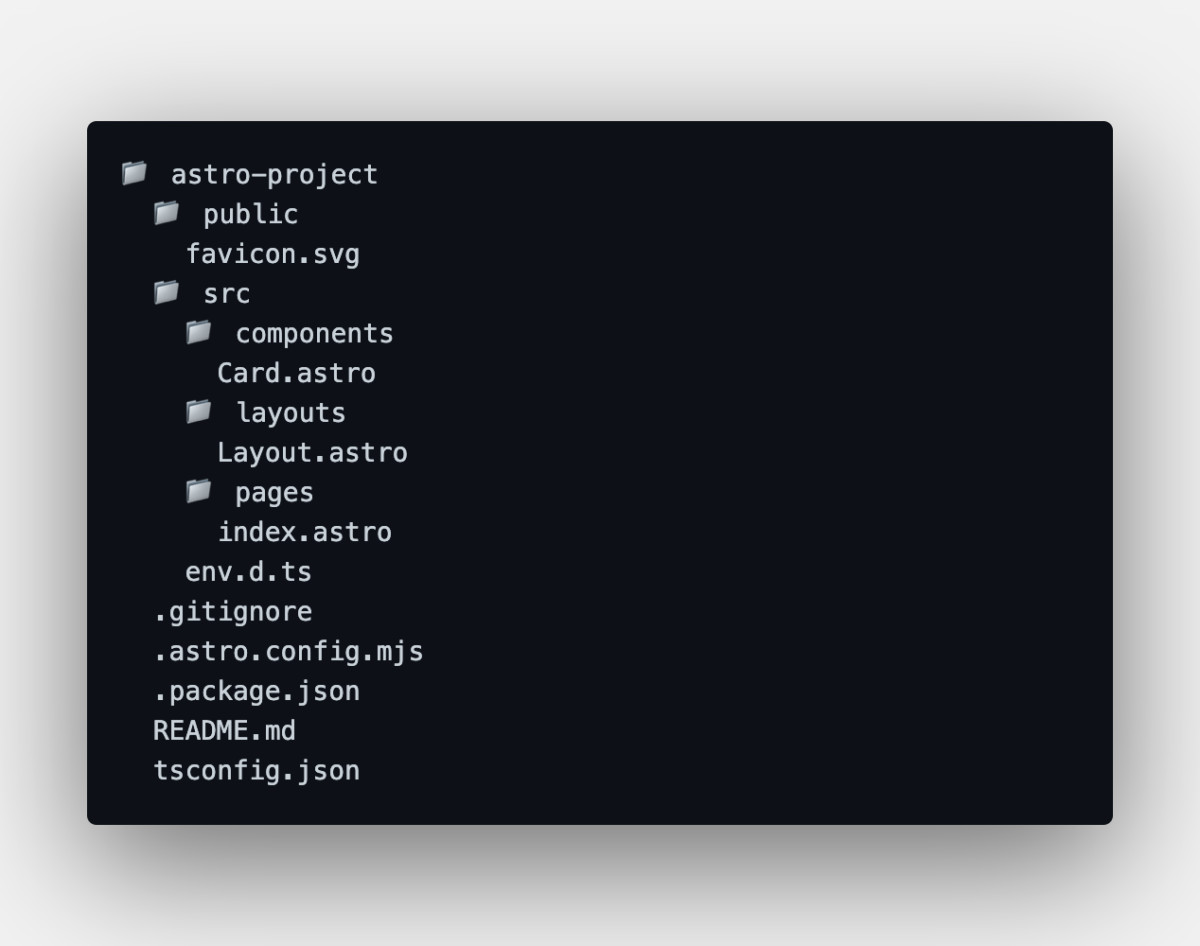
The /src folder contains the source code of your project. This includes your dynamic/static UI components, layouts, pages, markdown, styles, etc. By default, Astro optimizes and bundles the files located in the /src folder to generate the final website that is sent to the browser.
If you are using Visual Studio Code as your code editor of choice, you can install the "Astro" extension to support the default `.astro` file extensions. To do this, open Visual Studio Code, go to the extensions marketplace, and search for "Astro." This extension provides syntax highlighting, autocompletion, and other useful features for working with Astro files in Visual Studio Code.
For more information on the function of each folder, you can check out the official Astro documentation - Project Structure.
Installing React in Astro
Before using React in your Astro project, you have to install the required dependencies to your project and modify your Astro configuration file. This process has been streamlined and simplified - so you can easily setup React by running the following command in your Astro project folder:
npx astro add reactOr, if you prefer `yarn`:
yarn astro add reactThis command will start the Astro CLI, which will automatically install the React dependencies and make the necessary updates to the Astro configuration file. Of course, before doing any action, the CLI will prompt you to confirm them. You can also do this process manually by following the official Astro docs.
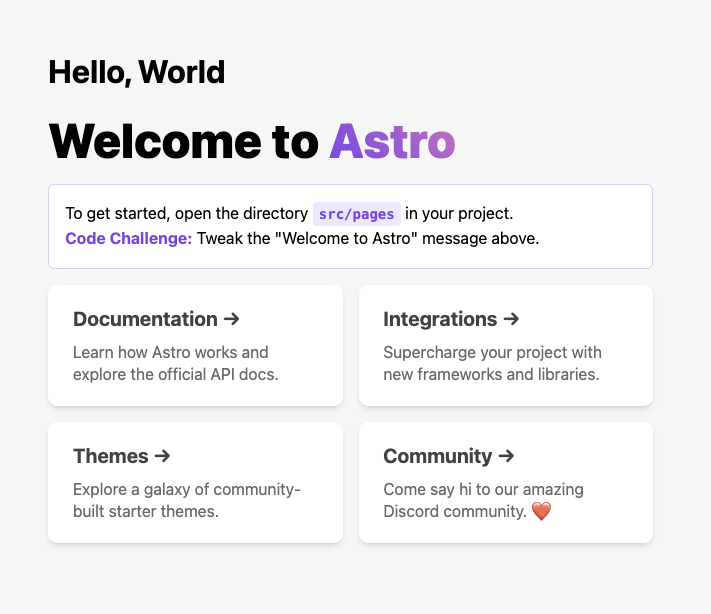
To confirm that React components work properly, let's create a simple React component in /src/components and name it MyFirstComponent.jsx:
export default ({ message }) => {
  return <h1>Hello, {message}</h1>;
};
This component has only one prop - message which is shown next to the “Hello,” string.
Next, let's import this React component into our Astro page /src/pages/index.astro by using the standard import declaration.
---
import Layout from "../layouts/Layout.astro";
import Card from "../components/Card.astro";
import MyFirstComponent from "../components/MyFirstComponent";
---

<Layout title="Welcome to Astro.">
  <main>
    <MyFirstComponent message="World" />
    <h1>Welcome to <span class="text-gradient">Astro</span></h1>
    <p class="instructions">
      To get started, open the directory <code>src/pages</code> in your project.<br
      />
      <strong>Code Challenge:</strong> Tweak the "Welcome to Astro" message above.
    </p>
  … other code …
  </main>
</Layout>
After saving this file, the Astro dev server will automatically reload the page. Now, the default Astro page should update and contain our new React component.
You can read more about React integration in Astro in the official documentation.
Integrating Tailwind CSS
Tailwind is a popular utility-first CSS framework that has been gaining popularity lately and has become the standard in many modern web applications. It enables us to use predefined classes in components instead of writing custom styles - shortening the time to design websites by a lot.
Same as before, we’ll use the Astro CLI to add Tailwind integration to our Astro Project. To get started, run the following command in your Astro project folder:
npx astro add tailwindOr, if you prefer `yarn`:
yarn astro add tailwindThe Astro CLI wizard will prompt us to install all required Tailwind dependencies; it will automatically generate the tailwind.config.cjs file and update the Astro configuration file (astro.config.mjs).
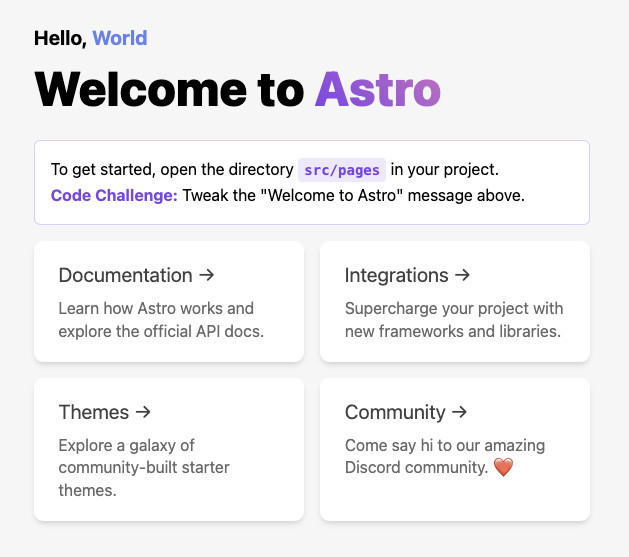
As soon as the CLI finishes, we can restart our Astro dev server and use Tailwind CSS classes to style our components. Let's update the style for the MyFirstComponent.jsx component, so the message prop is blue:
export default ({ message }) => {
  return (
    <h1 className="text-xl font-bold">
      Hello, <span className="text-blue-500">{message}</span>
    </h1>
  );
};
With this change, our project home page will update to:
Playing with Astro Islands
As we mentioned before, Astro Islands compile to plain HTML by default - so what will happen if we have an interactive component? Taking into account our existing Astro project, let's create a new React component, name it Counter.jsx, and place it in /src/components. This component will show a simple counter and two buttons that will increment or decrement its value. We’ll add some Tailwind classes along the way:
import React from "react";

export default () => {
  // We’ll set initial value for our counter = 3
  const [count, setCount] = React.useState(3);


  return (
    <div className="mb-10 bg-blue-100 p-3 rounded-lg">
      <h1 className="text-xl font-bold mb-5">{count}</h1>
      <button
        className="bg-white text-sm font-medium border p-3 rounded-lg mr-2"
        onClick={() => setCount(count + 1)}
      >
        + Add
      </button>
      <button
        className="bg-white text-sm font-medium border p-3 rounded-lg"
        onClick={() => setCount(count - 1)}
      >
        - Subtract
      </button>
    </div>
  );
};
And we’ll add this component to our homepage located in /src/pages/index.astro:
---
import Layout from "../layouts/Layout.astro";
import Card from "../components/Card.astro";
import ReactComponent from "../components/ReactComponent";
import Counter from "../components/Counter";
---

<Layout title="Welcome to Astro.">
  <main>
       <ReactComponent message="World" />
      <Counter />
       <h1>Welcome to <span class="text-gradient">Astro</span></h1>
        … other code …
   </main>
</Layout>
If we try to click the Add or Subtract buttons on our homepage now, nothing will happen. As we discussed before, Astro Islands are compiled into plain HTML, and NO JavaScript is loaded into the page. We can confirm this by opening our development tools, navigating to the Network tab, filtering by JS, and monitoring the JavaScript loaded into the page. Please note that in dev mode, some JavaScript is loaded for debugging purposes and/or for hot reloading the page on changes.
We can make our Counter.jsx component interactive by updating our /src/pages/index.astro page (where we include the component) and adding the client:load or client:visible props, like so:
---
import Layout from "../layouts/Layout.astro";
import Card from "../components/Card.astro";
import ReactComponent from "../components/ReactComponent";
import Counter from "../components/Counter";
---

<Layout title="Welcome to Astro.">
  <main>
       <ReactComponent message="World" />
       <Counter client:load />
       <h1>Welcome to <span class="text-gradient">Astro</span></h1>
        … other code …
   </main>
</Layout>
Now with this update, we can navigate to our homepage in our browser and try pressing the Add or Subtract buttons. The counter value will change now. If we open the same Network tab as we did before, we’ll notice that a new JavaScript file is loaded to the page labeled Counter. This is actually the component that we defined before - it's hydrated on page load to help us make this component interactive.
For more information on the Template Directives client:load, client:visible, and others, you can check out the official Astro Documentation.
Summary
Astro is a great next-gen framework with many unique features targeted toward performance. Its island architecture enables us to optimize components and serve minimal JavaScript code to the front end. This makes Astro perfect for content-focused websites like product landing pages, portfolios, e-commerce sites, etc. As such, it's a great alternative to existing frameworks like Next.js, which are more focused on complex web applications. Hopefully, you're now ready to get started with Astro and build your very first website.

