
MongoDB is one of the – if not the most – popular document-oriented database management systems out there.
The MongoDB extension for PHP has been around since 2015, and thanks to the official mongodb/laravel-mongodb package, it’s now even easier to integrate MongoDB with Laravel.
In this article, I'll walk you through the entire process of setting up Laravel with MongoDB and using it as a drop-in replacement for your existing database management system.
This article assumes that you have experience working with the Laravel Eloquent ORM and the query builder. You can even treat it as a Laravel MongoDB tutorial, assuming you are familiar with both.
Note: Since the writing of this article, MongoDB has released official support for Laravel integration. The integration streamlines the setup and functionality of MongoDB within Laravel applications. Read more here.
Installing Platform Dependencies
At the beginning of this article, I talked about the MongoDB PHP extension. It is a compiled library that enables PHP applications to communicate with a MongoDB server. Similar extensions also exist for relational database management systems such as MySQL, SQLite, and PostgreSQL.
If you want to use any of these database systems in your Laravel applications or your PHP applications in general, you have to install the corresponding PHP extensions.
In most cases, installing these extensions is not that hard. They're available through official repositories in all major Linux distributions. You can install the MongoDB extension on Ubuntu, for example, by simply executing the following command:
sudo apt install -y php-mongodbBut there is an issue with this method of installation.
The mongodb/laravel-mongodb package responsible for integrating MongoDB with Laravel requires you to have at least version 1.10.0 of the extension. Ubuntu 21.04, the latest release of the distribution, has version 1.9.2 available through the official repositories.
You can get the latest version in two ways.
You can use a third-party repository such as the one from Ondřej Surý or install the extension directly from PECL.
In this article, I'll demonstrate the use of PECL because it's platform-agnostic, and knowledge of installing extensions from PECL will be helpful in your career as a PHP developer.
PECL or PHP Extension Community Library is the go-to place for installing PHP extensions. I'll demonstrate the extension installation process for Linux only. I've tried doing this using Windows and failed due to some weird connection issues and I don't own a macOS machine so, I can't test on that platform.
If you're on a non-Linux platform, I would suggest using Laravel Homestead for this article. In my opinion, Linux provides the best PHP development experience among all the available platforms.
To install a PHP extension from PECL on a Linux system, you'll have to download the extension source code and compile it to a library by yourself. For that, you'll need a working installation of GCC, the PECL program, and additional PHP headers, along with a few other stuff.
You can install all these by executing the following command:
# Debian/Ubuntu/Derivatives
sudo apt install -y build-essential php-dev php-pear

# Fedora
sudo dnf groupinstall "Development Tools" -y && sudo dnf install php-devel php-pear -y

# CentOS
sudo yum groups install "Development Tools" -y && sudo yum install php-devel php-pear -y
Once the installation finishes, you can install the extension by executing the following command:
sudo pecl install mongodbThis command will download the extension source code, compile the library, and put it in the correct directory.
To activate the extension, you'll have to modify the php.ini file. To do so, first, determine the location of the php.ini file. Execute the following command:
php -iThis command executes the phpinfo() function. This function outputs detailed information about the current PHP installation. Scroll up towards the beginning of the output and look for the following line:
Configuration File (php.ini) Path => /etc/php/7.4/cliDepending on the PHP version you've installed, the location can be different. if you have installed PHP 8.1 instead of 7.4 on your system, then the cli directory will reside inside the /etc/php/8.1 directory. I hope you get the idea.
Open the file using the nano text editor by executing the following command:
sudo nano /etc/php/7.4/cli/php.iniScroll down until you reach the Dynamic Extensions section. You can also do a forward search in nano by pressing Ctrl + W key combination. Once you've found the desired portion of the file, you'll see a list of extensions. You'll have to add the following line of code to activate the MongoDB extension:
extension=mongodbYou can add this line anywhere in the Dynamic Extensions section. Save the file by hitting Ctrl + S and exit the text editor by hitting the Ctrl + X key combination.
You can also activate the extension by creating a dedicated configuration file inside the /etc/php/7.4/cli/conf.d directory. Just create a file named 10-mongodb.ini inside that directory with the following content.
; configuration for php mongodb module
; priority=10
extension=mongodb.so
PHP will load this file automatically. The priority is pretty much useless as the extension doesn’t depend on any other extensions. I chose the priority to be 10 because the MySQL extension has the same priority. Make sure to follow any one of these two techniques and not both of them.
Also, keep in mind, that depending on the version of PHP, the directory location may change. For example, on a real server, you’ll probably have PHP-FPM installed. In cases like that, you’ll have to work inside the /etc/php/7.4/fpm directory instead of the /etc/php/7.4/cli directory. The CLI is the PHP executable that you invoke from your terminal and FPM is used by NGINX.
Verifying The Installation
To verify if the extension is active or not, you'll have to look at the phpinfo() output once again.
php -iScroll through the output, and in the extensions section, look for MongoDB.
mongodb

MongoDB support => enabled
MongoDB extension version => 1.10.0
MongoDB extension stability => stable
libbson bundled version => 1.18.0
libmongoc bundled version => 1.18.0
libmongoc SSL => enabled
libmongoc SSL library => OpenSSL
libmongoc crypto => enabled
libmongoc crypto library => libcrypto
libmongoc crypto system profile => disabled
libmongoc SASL => disabled
libmongoc ICU => disabled
libmongoc compression => enabled
libmongoc compression snappy => disabled
libmongoc compression zlib => enabled
libmongoc compression zstd => disabled
libmongocrypt bundled version => 1.2.1
libmongocrypt crypto => enabled
libmongocrypt crypto library => libcrypto

Directive => Local Value => Master Value
mongodb.debug => no value => no value
If you see something like the above, you're good to go. If you don't, then maybe you have done something wrong along the way. Just recheck all the previously-mentioned steps and make sure you've done everything correctly.
Setting-Up a Laravel Project With MongoDB
Now that you installed the MongoDB PHP extension on your system, you're ready to integrate MongoDB with your Laravel applications.
I've already mentioned the mongodb/laravel-mongodb package responsible for integrating MongoDB with your Laravel applications. If you're getting confused about the purpose of the extension and this package, let me clarify.
The MongoDB extension is a low-level driver that lets PHP applications communicate with a MongoDB server. The mongodb/laravel-mongodb package, on the other hand, integrates this driver with Laravel in a way so that you can use MongoDB as a drop-in replacement for your current database management system.
The concept will become clearer once you start using the package yourself. To do so, you'll need a Laravel project. Bootstrap a new Laravel project in whatever way you prefer. I prefer using the Laravel Installer.
laravel new guide-to-laravel-and-mongodbOnce the application is ready, cd into the project root and execute the following command to install the mongodb/laravel-mongodb package:
composer require mongodb/laravel-mongodbDepending on your internet speed, the installation process may take a few moments to finish. The next step is to create the configuration for Laravel MongoDB connection. To do so, open the project in your favorite text editor or IDE and locate the config/database.php file.
Inside that file, you'll see an array named connection. This array contains the connection configurations for the different database management systems supported by Laravel.
You'll have to append the connection configuration for MongoDB with Laravel here. There are two ways to do that.
The first way is to configure individual attributes of the connection, such as the host, port, database, username, password, and a few other information.
The second way is to use a DSN or Data Source Name to connect Laravel to MongoDB. I prefer going the DSN way for reasons that will become apparent very soon. To use a DSN to configure the database, append the following lines of code within the connections array:
'mongodb' => [
            'driver' => 'mongodb',
            'dsn' => env('DB_DSN'),
            'database' => env('DB_DATABASE', 'homestead'),
        ],
Now open the .env file in your project. Replace all the options prefixed by the word DB_ with the following lines of code:
DB_CONNECTION=mongodb
DB_DATABASE=guide_to_laravel_and_mongodb
DB_DSN=mongodb+srv://<username>:<password>@cluster.server.com/
Don't worry about the DB_DSN option right now. I'll explain it in a later section. Once you've updated the .env file, make sure to update the .env.example file accordingly.
Setting-Up a Free MongoDB Cluster
By now, it should be a no-brainer that you need a MongoDB server to go with your Laravel application. You can install and configure MongoDB on your machine, but there is a better way.
MongoDB Atlas is a Database-as-a-Service system that provides managed database servers backed by popular cloud providers such as AWS, Azure, and GCP. You can provision a free database server for your development workloads without providing any credit/debit card information.
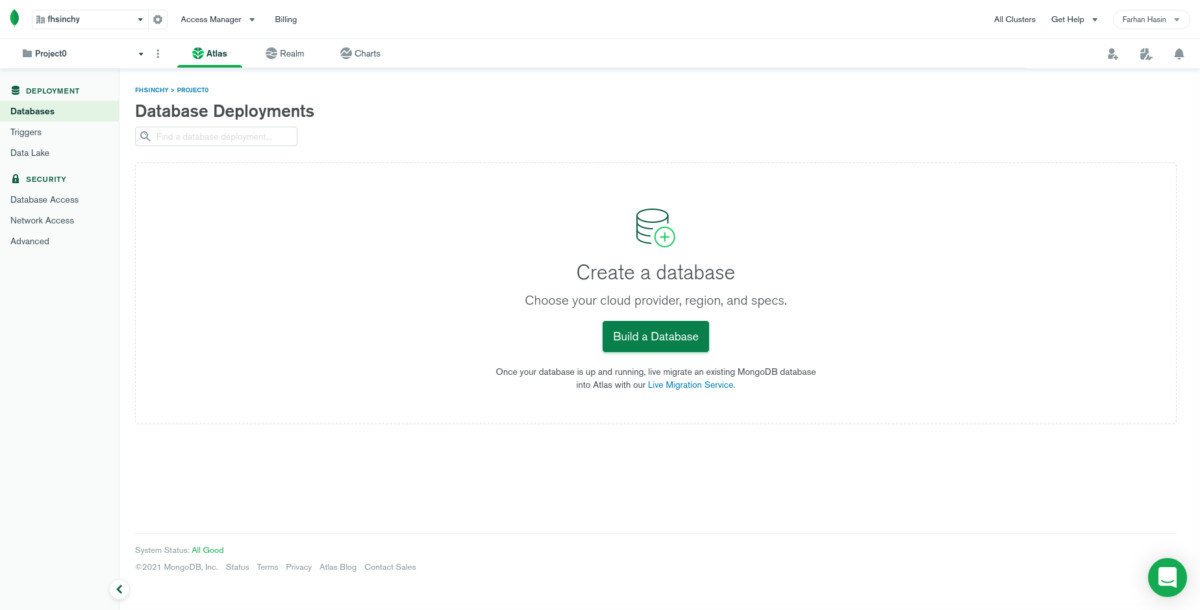
Navigate to MongoDB Atlas and create a free account. Signing up is as simple as signing up for a social network. Once signed up, create a new project. Projects are like containers for clusters. You can have multiple servers running inside a single project.
After creating the project, you can create a new cluster by hitting the big Build a Database button.
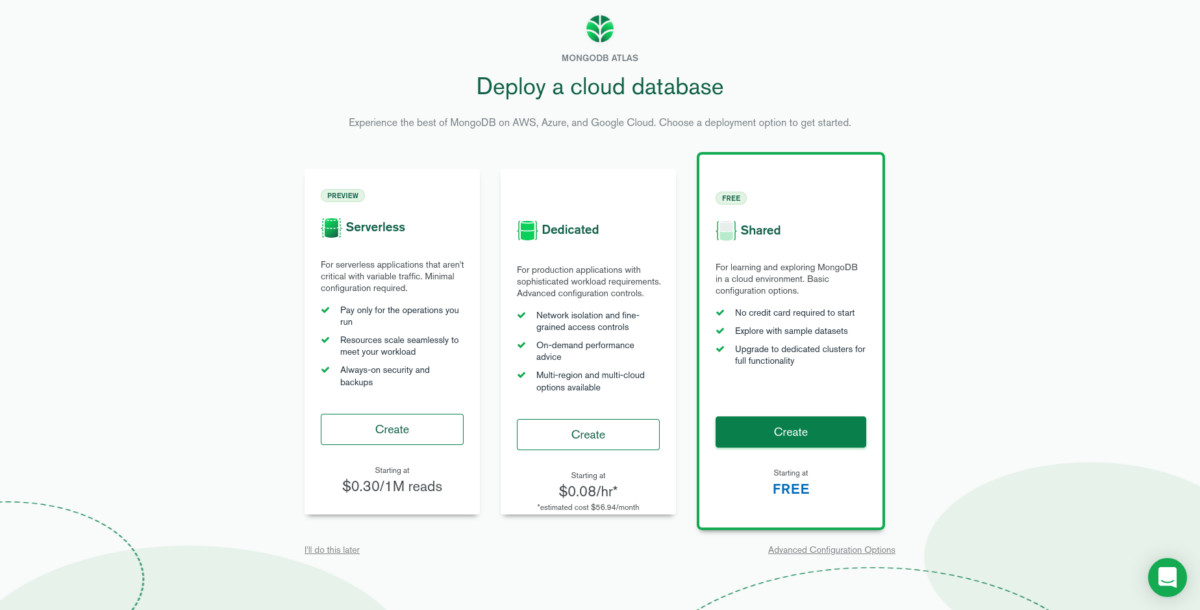
In the next step, select Shared as the server type and hit the Create button.
Next, MongoDB Atlas will ask you about your cloud provider of choice, region, and cluster tier. Choose AWS as the cloud provider. Pick the country closest to you. I chose Singapore because that's the closest to my country. Make sure to pick the M0 Sandbox as your cluster tier. It's the only one that's free forever.
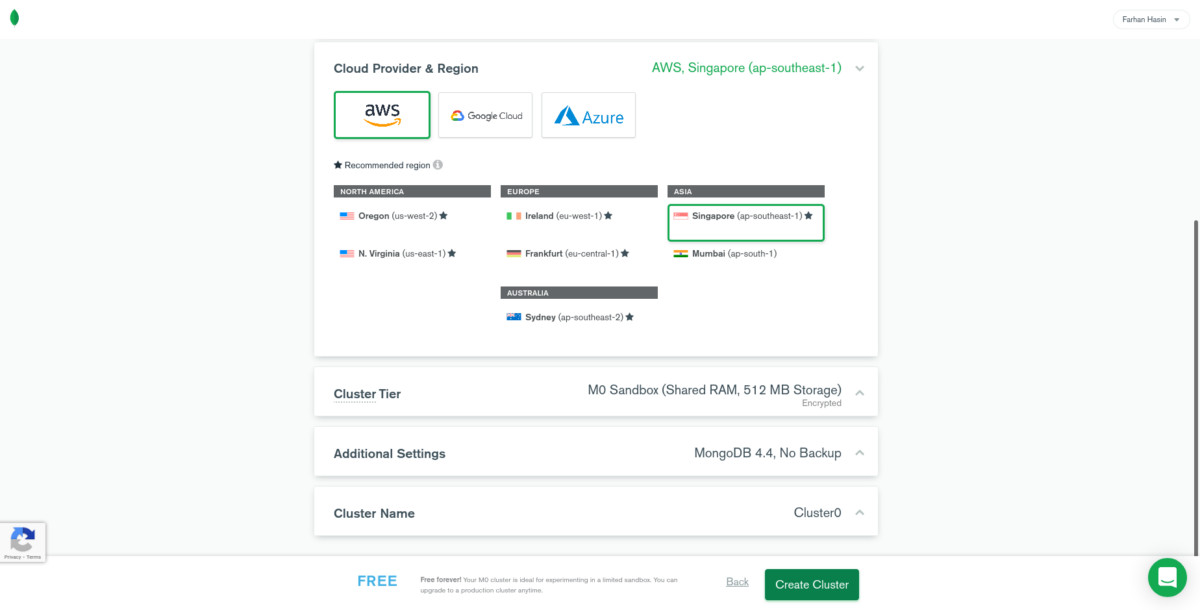
Leave everything as is and press the Create Cluster button at the bottom right corner. Provisioning the server may take up to five minutes, so be patient. Once done, press the Connect button. You'll have to configure the allowed IP addresses and create a new database user.
For connection, IP address, press the Allow Access from Anywhere button. In a production environment, you should only allow your application server to connect to the database. Make sure you click the green Add IP Address button, or Atlas will not save this Laravel-MongoDB configuration.
As for the database user, choose a name like admin and press the Auto Generate Secure password button. Make sure to copy the password somewhere safe before hitting the Create Database User button. Make sure that you press the Create Database User button or, Atlas will not create the user.
After creating the new user database user, press the Choose a connection method button. In the next step, pick any of the three connection methods. All you need from this step is the DSN. For simplicity, click on Connect with the MongoDB Compass button. On the next step, you'll get a connection string as follows:
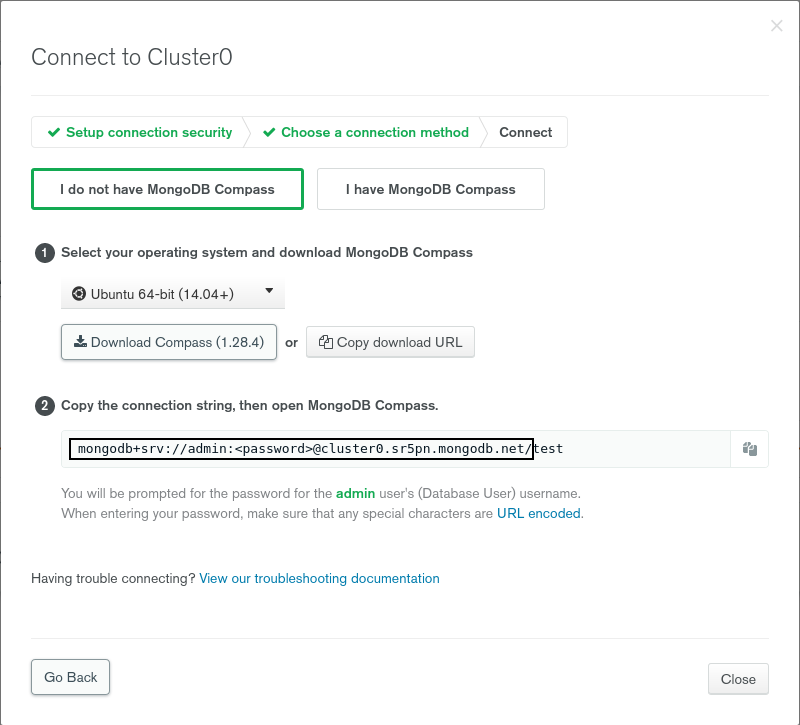
The highlighted part is the DSN you need. Copy the string and paste it as the value of DB_DSN in your .env file. Make sure the replace the <password> part with your password.
DB_CONNECTION=mongodb
DB_DATABASE=guide_to_laravel_and_mongodb
DB_DSN=mongodb+srv://admin:82VcUMN1tnGiBRTX@cluster0.sr5pn.mongodb.net/
Keep the trailing slash at the end. Now you're ready to use the cluster. To test out the connection, you can try migrating your database.
php artisan migrateIf the migration runs successfully, that means the connection is working. Go back to Atlas, and on the Collections tab, you'll find your newly migrated database.
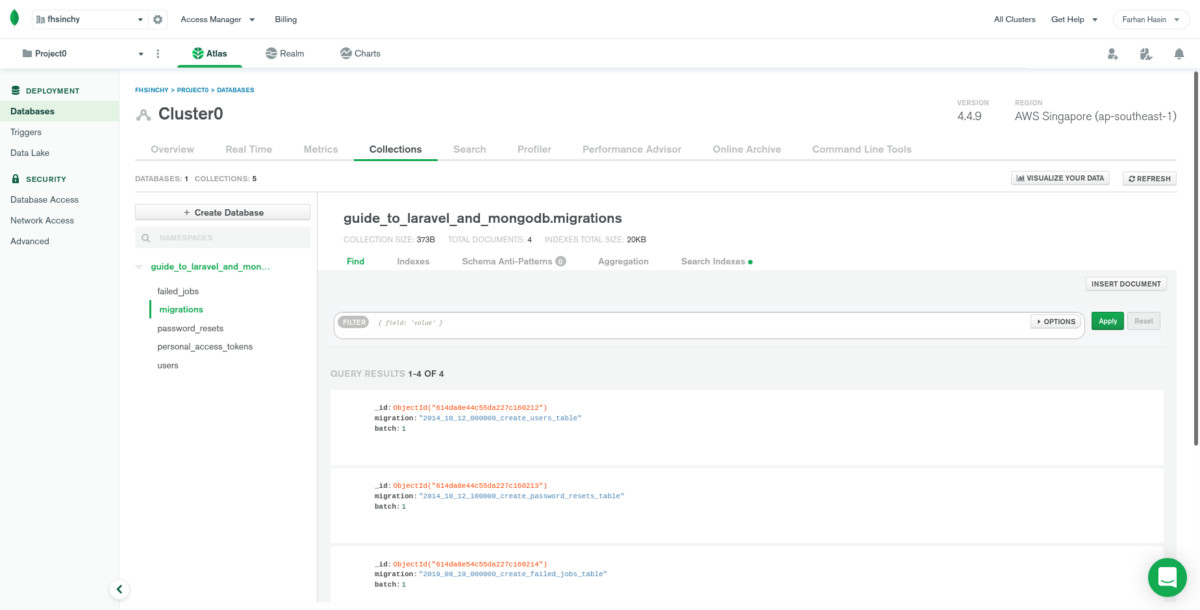
As you can see from the get-go, the mongodb/laravel-mongodb package integrates MongoDB like any other relational database management system. That's all you need to have MongoDB working with your Laravel projects. Throughout the rest of the article, I'll discuss a few more integrations and some MongoDB-specific functionalities in this package.
Eloquent Models With MongoDB
By default, every Laravel model extends the use Illuminate\Database\Eloquent\Model class. But models using MongoDB as the database management system have to use the MongoDB\Laravel\Eloquent\Model class as the parent. So whenever creating a new model, make sure to swap out the parent class.
The authenticatable models in Laravel, such as the App\Models\User model, use the Illuminate\Foundation\Auth\User class as the parent. The package comes with the MongoDB\Laravel\Auth\User class, which serves class, which serves the same purpose but for models using MongoDB. So make sure to swap out the parent class properly in authenticatable models also. I’ve tested the package with Laravel Breeze and it worked flawlessly.
The package also comes with the MongoDB\Laravel\Eloquent\SoftDeletes trait that lets you use the soft deletion feature with MongoDB. Other eloquent features, such as mass assignment protection, works identically with MongoDB. But make sure to use the $fillable array instead of the $guarded array. Using the $guarded array may produce unexpected results.
You can define custom table names in regular Laravel models using the $table protected property on models. When using a MongoDB model, you can use the $collection protected property for the same purpose.
Relationships also work the same way, although the support is limited to only the following types:
- hasOne
- hasMany
- belongsTo
- belongsToMany
There are also two new MongoDB-specific relationship types. They are as follows:
- embedsOne
- embedsMany
Now embedding documents is one of the ways to model relational data in MongoDB. If you would like to learn more about this concept, follow the official MongoDB docs.
Query Builder and Migrations
The mongodb/laravel-mongodb works pretty nicely with the query builder as well. You can execute all the query builder operations available in Laravel by default. The package also comes with an alias of the DB::table() method so that you can call DB::collection() in your code. Apart from a little syntactic sugar, the method provides nothing else. So if you're migrating to MongoDB on an existing process, you can leave the query builder calls as is.
You've already seen that database migration works with MongoDB just like any other database management system. That means you can write migration scripts like you used to before. But like the eloquent relationships, the schema-building support is limited. Don't worry about calling any unsupported function in your migration scripts. The package implements all the unsupported operations as dummy passthrough so that you don't have to face unwanted errors.

Laravel MongoDB Integration
MongoDB now provides official integration with Laravel through its PHP library. This support simplifies setting up MongoDB with Laravel’s Eloquent ORM and makes it easier to manage data and leverage MongoDB’s features directly.
With this update, developers can use MongoDB for tasks like authentication, querying, and schema management while staying within the Laravel framework.
For a quick guide, visit MongoDB’s official Laravel support page.
Conclusion
I would like to thank all Laravel developers for the time they've spent reading this article on how to use Laravel with MongoDB. I hope you've enjoyed the Laravel MongoDB tutorial and have learned some valuable stuff from this article. The mongodb/laravel-mongodb package has excellent documentation of its own. I would highly suggest that you go through their documentation before starting any serious project that uses MongoDB in Laravel.
If you have any questions or confusion about how to use MongoDB with Laravel, feel free to reach out to me. I'm available on Twitter and LinkedIn and always happy to help. Till the next one, stay safe and keep on learning.
If you're interested in keeping up-to-date with all things Laravel, add these guides to your reading list:
