
Introduction
Have you ever been in a situation where you had to manage your containerized applications on the public cloud and found several Kubernetes orchestration platforms challenging to adopt?
From this article containing a demo deployment of a containerized Python application, you will learn about Cloud Run and the features it provides to effectively manage your containerized applications on the Google Cloud Platform.
Prerequisites
This article will be hands-on with steps on deploying a sample application to Cloud Run. It is required that you have the following items to enable you to follow along:
- An account with billing enabled on the Google Cloud Platform. If you do not have an account, you can create a free account to receive $200 worth of cloud credits, valid for 90 days.
- Docker and docker-compose installed on your computer to enable you to test the demo application of this tutorial on your computer.
- The gcloud CLI installed on your computer. You will provision resources through the gcloud CLI, and confirm they were created from the Google Cloud console.
Introducing Google Cloud Run
The Cloud Run service on the Google Cloud Platform was introduced to simplify running serverless containers pushed to the Container Registry.
Cloud Run is a fully managed serverless service for running HTTP-driven containers on the Google Cloud. By being serverless, Cloud Run automatically manages the compute engine instances running your container, allowing you to focus on your core application logic.
Cloud Run for Anthos can also be used in scenarios where you need to leverage both serverless applications and your existing Kubernetes infrastructure.
GCP Cloud Run leverages the portable nature of containers to enable you to deploy all your containerized applications, irrespective of the technology stack or programming language it was written in.
To deploy your application within a container image to Cloud Run, you need to create a service with a container image specified from the Container Registry via the gcloud CLI or cloud console. In later parts of this article, you will walk through the process of making a sample deployment.
While Cloud Run provides many features, below are two of those features that may interest you:
- Auto Scaling
Google Cloud Run applies the horizontal scaling technique to every running service. By applying horizontal scaling, Cloud Run will spin up more instances to handle spikes in the amount of incoming traffic to your application. To minimize operations costs, Cloud Run will spin down the number of instances to zero in the absence of HTTP traffic for over 15 minutes which makes the Cloud Run pricing completely justified.
Based on your needs, you can specify a minimum number of instances to be kept running even when there is no traffic, and you can also specify the maximum number of instances that Cloud Run can spin up to handle a sudden spike in HTTP traffic.
- Logging and Monitoring
Cloud Run natively integrates with services with the Operations suite (formerly known as stackdriver) on the Google Cloud to provide you with meaningful insights from your running services.
Similar to how you can describe or view the logs from your Kubernetes pods using the kubetcl CLI, the Cloud Monitoring service provides you with performance metrics and logs from your running service.
You can also create uptime checks to monitor the running status of your services within Cloud Run, similar to how you would set up probes for a Kubernetes cluster. What follows is a Google Cloud Run tutorial about deploying serverless containers.
Within the next sections of this article, you will download a sample Python application that renders an HTML page to understand how to run Python on Google Cloud.
After testing the application from your terminal, you will create a Dockerfile to build an image of the demo application, then push the built image to the Container Registry.
As the last step of the article, you will create a service on Cloud Run using the pushed image from a repository within the Container Registry.

Containerizing a Python Application
With an understanding of what Cloud Run is from the last section, you will now begin the process of deploying a demo application. You will download a Python application folder from Google Cloud Storage, then write a Dockerfile to build a Docker image out of the downloaded application.
To begin, execute the gsutil command below to download the files for a pre-built python application from a bucket within the Cloud Storage service.
gsutil cp gs://nwani-bucket/* . The command above will download a python-application folder to your current working directory.
Using your preferred code editor, create a Dockerfile within the python-application folder. The Dockerfile will contain the instructions for building a Docker image of the Python application.
Add the content of the code block below containing the steps for building a Cloud run Docker image into the Dockerfile:
# base python image
FROM python:alpine as python

# create a virtual environment
ENV VIRTUAL_ENV=/opt/venv
RUN python3 -m venv $VIRTUAL_ENV
ENV PATH="$VIRTUAL_ENV/bin:$PATH"

# copy requirement.txt file
COPY requirements.txt requirements.txt

# install packages listed in copied requirements.txt file
RUN pip install -r requirements.txt

WORKDIR /url

COPY . .

# Expose a PORT to access the python application
EXPOSE $PORT

# start the uvicorn server on $PORT variable
CMD exec uvicorn routes:app --host 0.0.0.0 --port $PORT
The Dockerfile above will build a new Docker image using the Python image as a parent image. After pulling the Python parent image, it will create a virtual environment then copy the requirements.txt file and install all packages listed in the requirements.txt file. Lastly, it will start the uvicorn server to run the Python application.
From the Dockerfile, you will notice that the container’s port is exposed at the value of a PORT variable, and the uvicorn server is also configured to run at the value of the PORT variable. Using the PORT variable is required by Cloud Run, and the value of the PORT variable will be injected by Code Run while deploying a service using the Docker image built from this application.
Testing Python Application
In the last section, you downloaded the files of a python-application and created a Dockerfile containing steps to build an image of the application.
Now, you will proceed to run the build command to build a Docker image using the Dockerfile you have created.
Execute the serverless docker command below to build an image for the python-application and assign a tag of python-application to the new image:
docker build -t python-application .Next, execute the command below to run the tagged container on port 8000 passing in the PORT environment variable:
sudo docker run -e PORT=8000 -p 8000:8000 python-applicationYou can proceed to open the python application on your browser at http://localhost:8000/ to view the HTML page.
The image below shows an HTML page displayed from the Python application built with FastAPI.

Having tested out the application, you can now begin the deployment process in the next section, using Docker to push the built application image into the Google Container Registry.
Authenticating Docker
If this is your first time making an attempt to push a docker image to the Google Container Registry, you will need to authenticate Docker with your project on the Google Cloud Platform.
In this section, you will use the gcloud CLI to create a service account on the IAM service within the Google Cloud. You will then download the service account key to your computer and finally authenticate Docker through the password method using the service account key.
Execute the iam command below to create a new service account with the name of local-docker-service. A service account allows non-human interaction with your resources within the Google Cloud.
gcloud iam service-accounts create local-docker-serviceExecute the config command below to retrieve your project ID on the Google Cloud. Take note of the ID returned from the command below as you will need it for the next steps:
gcloud config listNext, execute the command below, replacing the PROJECT_ID placeholder with your google cloud project ID to grant the storage admin and run the admin role to the service account.
gcloud projects add-iam-policy-binding PROJECT_ID --member "serviceAccount:local-docker-service@PROJECT_ID.iam.gserviceaccount.com" --role "roles/storage.admin, roles/run.admin"The storage admin role assigned above will be needed to push the image to the container registry.
Also, execute the command below, replacing the PROJECT_ID placeholder with your google cloud project ID to grant the run admin role to the service account.
service@PROJECT_ID.iam.gserviceaccount.com" --role "roles/run.admin"The run admin role assigned above will be needed when you push the image to Google Cloud Run.
Execute the command below, replacing the PROJECT_ID placeholder with your Google Cloud Project ID to create and download a service account key in JSON format from the Google Cloud IAM. This key will be used as a password to authenticate with Docker.
gcloud iam service-accounts keys create key.json --iam-account local-docker-service@PROJECT_ID.iam.gserviceaccount.comExecute the command below to authenticate your Docker instance with the Container Registry service on the Google Cloud using the service account key in the key.json file downloaded:
docker login -u _json_key -p "$(cat key.json)" https://grc.ioAt this point, your Docker instance should be authenticated with the Container Registry and you should be able to push a local Docker Image to the Container Registry in the next step.
Note: The Key.json file downloaded to your current directory contains sensitive credentials about your service account. You should either delete the file or move it into a secure location on your computer.
Pushing Local Image To Container Registry
With the docker image built from the last section, you will now tag the local image for the python application and push it into a registry within the Google Container Registry service.
A valid tag for an image to be pushed into the container registry consists of a HOSTNAME/PROJECT-ID/IMAGE-NAME placeholders where an example HOSTNAME is us.gcr.io, PROJECT-ID is your Google Cloud Project ID and IMAGE-NAME is the name’s name.
To tag the image for the Python application, execute the tag command below:
docker tag python-application us.gcr.io/PROJECT-ID/python-applicationExecute the command below next to push the tagged image into the python-application container registry:
docker push us.gcr.io/PROJECT-ID/python-applicationAfter the push operation has been completed, you can view the pushed image within the Container Registry using the Google Cloud Console.
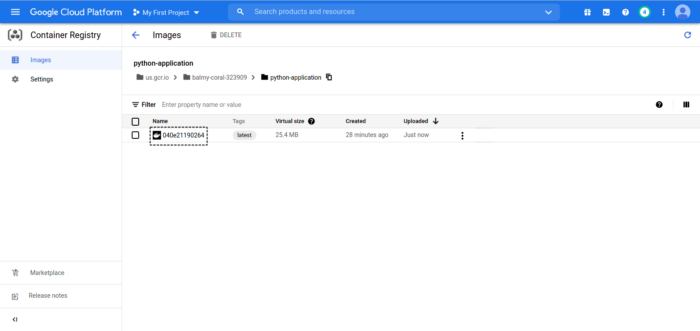
Hover your mouse over the Image name as shown in the highlighted box within the image above to copy a URL pointing to this image. Store the URL in a text editor as you will make reference to it within the next step.
Deploying Container Image To Cloud Run
In the last section, you pushed a Docker image into the Container Registry. In this next section, you will focus on deploying a service within Cloud Run using the pushed image.
Execute the run deploy command below, replacing the IMAGE-URL with the URL to the image within the container registry to create a service named python-deployment within the Cloud Run.
gcloud run deploy python-deployment --image=IMAGE-URL --region=us-central1 --allow-unauthenticatedIt is important to note that by default, services on Code Run require some form of authentication to be invoked via their URL endpoints. The --allow-unauthenticated option passed into the deploy command above disables the authentication requirement for this service.
A summary of the service deployment will be printed out to your console after the deployment has been completed. Take note of the Service URL as you will use it within the browser to navigate to the deployed application.

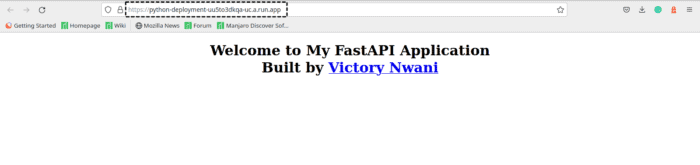
The Service URL printed out in the deployment summary points to the deployed application. Opening it in the browser you will see the HTML template rendered by the python application.
From the highlighted box within the image below, you will observe that the page opened in the web browser is from the python-application service deployed on Cloud Run.
Similar to how you can view metrics from your running Kubernetes cluster using a tool such as Prometheus, the Cloud Run dashboard also provides several insights into your running service.
The metrics tab within the service dashboard provides a graphical visualization of metrics collected from the running service within a specified time interval.
An example is the image below that shows the request count made while testing the service and how many container instances were spun to handle the request.

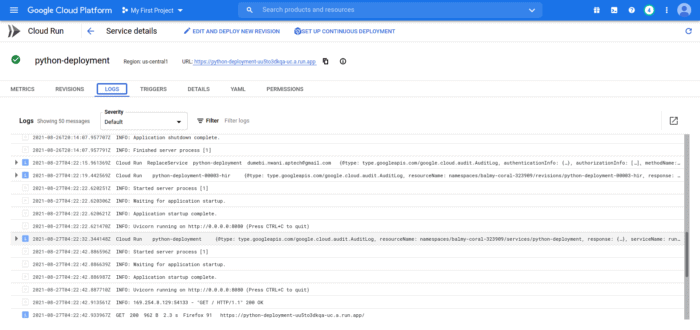
The logs tab also shows logs from both the service and the application running within the service, similar to what you’ll get when you describe a running pod using the kubetcl command.
The image below shows all logs collected from the python-deployment service. You can however filter the logs by selecting a severity level from the severity dropdown.
At this point, you have completed the process of deploying a containerized Python application in very minimal steps to Cloud Run. You can proceed to use the python application via its service URL.
Summary
Huge congratulations for reaching the end of this tutorial!
Within this tutorial, you, as a software developer, learned about Google Cloud Run and the features it provides when managing serverless applications. You moved further into containerizing a sample Python application and pushed it into the Google Container Registry.
In the final sections, you used the gcloud CLI to create a service on Cloud Run which used the docker image you pushed into the Container Registry.
After creating the service, you tested the deployment through its service URL by using your browser to open the HTML page rendered from the REST API within the deployed docker container.
As a further step for this article, you can set up a deployment pipeline for your Python application service on Cloud Run. You can attach a trigger from Cloud Build to the python-application service to automatically build a new image when a change is made to the Python application source code. After building the image, Cloud Build will redeploy the python-application service, using the new image.
Good luck!
