
Stripe fintech is a popular company that allows you to accept payment from your customers worldwide. Stripe's mission is also to provide benefits, including security against fraud, which is also the cause of a UX problem we will attempt to solve here as software developers.
It is considered best practice to use the Stripe Elements JS library when accepting payments. We will do that today with the advantage of allowing our users to update their billing addresses while checking out.
Stripe Elements allows us to securely collect sensitive information from our users without being vulnerable to theft. It is also important to note that you should only accept users’ payment information over a site protected with SSL.
For the remainder of this Nuxt.js and Laravel cashier tutorial, we will assume that you know the answer of why use Nuxt js and have a Nuxt 2 project setup and running already as well as a Laravel 9 or higher project. And if you want to know how to use Laravel cashier and Nuxt.js for creating a checkout form, you have come to the right place. Let's begin.
Table of contents
Installing Stripe Element in Our Nuxt Stripe Projects
We will be using the wrapper Vue.js around Stripe Elements called Vue Stripe, so to install this, run the command:
npm install @vue-stripe/vue-stripeOnce that is done, we now need to create a Nuxt plugin to customize our Stripe setup, including adding our keys and making the $stripe variable available globally to our application:
// src: plugins/stripe-elements.js

import Vue from 'vue'
import { StripePlugin } from '@vue-stripe/vue-stripe'

const options = {
  pk: process.env.STRIPE_PUBLISHABLE_KEY,
  stripeAccount: process.env.STRIPE_ACCOUNT,
  apiVersion: process.env.API_VERSION,
  locale: process.env.LOCALE
}

Vue.use(StripePlugin, options)
Now, to fill out the environment variables in our plugin, we need to make sure we get our STRIPE_PUBLISHABLE_KEY from the Stripe dashboard. The STRIPE_ACCOUNT is the email address associated with the Stripe account.
Visit the Stripe developer dashboard to access your API keys:
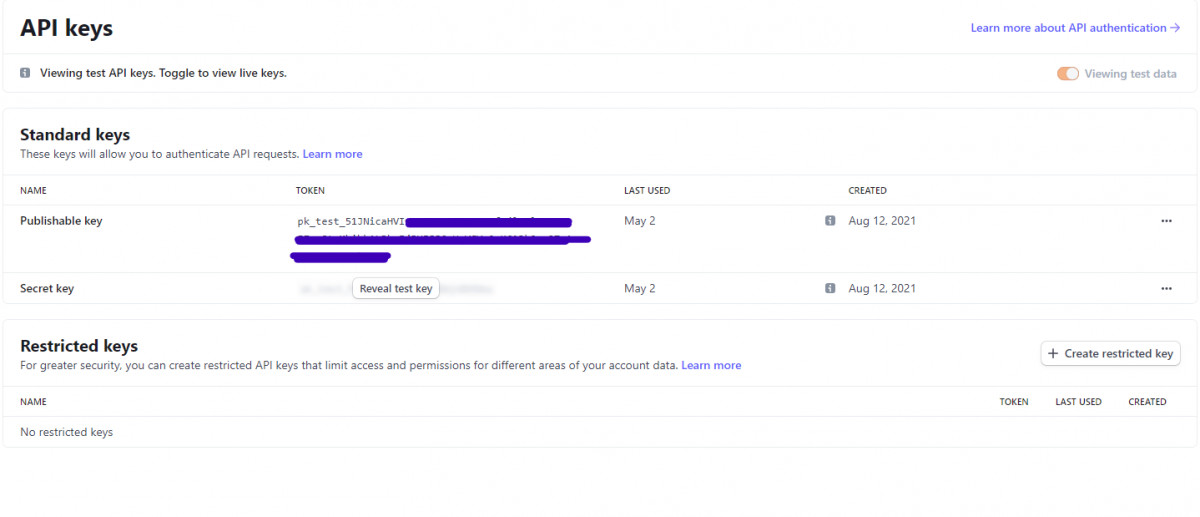
Copy your PUBLISHABLE KEY and paste it into your .env file. Also, make sure your nuxt.config.js has an env entry like this to make your environment variables available to your site:
// nuxt.config.js
{
    ....
    env: {
        STRIPE_PUBLISHABLE_KEY: process.env.STRIPE_PUBLISHABLE_KEY,
                                STRIPE_ACCOUNT: process.env.STRIPE_ACCOUNT,
    },
    ...
}
We will leave LOCALE and API_VERSION at their defaults for now.
Next, we will register our plugin.
Our plugin makes use of Javascript functions or variables that will only be available on the client like window and so this makes our plugin a good candidate for a client-only plugin:
// nuxt.config.js
{
    plugins: [
            {
              src: '~/plugins/stripe-elements.js',
              mode: 'client',
              ssr: false
            }
          ],
    env: {
        STRIPE_PUBLISHABLE_KEY: process.env.STRIPE_PUBLISHABLE_KEY,
        STRIPE_ACCOUNT: process.env.STRIPE_ACCOUNT,
    },
    ...
}
As you see, we have specified that the mode for our plugin should be client, and ssr: false makes sure our client doesn’t run on the server-side of Nuxt.js.
One final thing to complete our installation is adding the Stripe JavaScript CDN to our header. We will also achieve that with nuxt.config.js:
// nuxt.config.js
{
    script: [
      { src: '<https://js.stripe.com/v3>' }
    ]
    plugins: [
            {
              src: '~/plugins/stripe-elements.js',
              mode: 'client',
              ssr: false
            }
          ],
    env: {
        STRIPE_PUBLISHABLE_KEY: process.env.STRIPE_PUBLISHABLE_KEY,
                                STRIPE_ACCOUNT: process.env.STRIPE_ACCOUNT,
    },
    ...
}
Now that we have our initial setup on the frontend, we will configure the backend to match.
Installing Laravel Cashier
Install the Laravel Cashier package on your backend, allowing you to securely communicate with Stripe and charge a user’s card.
composer require laravel/cashierRunning this command will install Cashier and also publish some database migrations to help Cashier function, so the next thing to do is to run our migrations:
php artisan migrateNow that our database is up to date to work with Cashier, we will configure our User model to use the casher Billable trait:
<?php

use Laravel\\Cashier\\Billable;

class User extends Authenticatable
{
    use Billable;
}
Setup Cashier Environment Variables
Like we’ve set up our environment variables on the frontend, we will do the same on the backend with our STRIPE_KEY and STRIPE_SECRET. The other environment variables include CASHIER_CURRENCY_LOCALE, CASHIER_CURRENCY, CASHIER_LOGGER
STRIPE_KEY=pk_test_***
STRIPE_SECRET=sk_test_**
CASHIER_CURRENCY=ngn
CASHIER_CURRENCY_LOCALE=en
CASHIER_LOGGER=stack
Sync User Information With Stripe
As you can see that the Laravel Nuxt combination is highly beneficial, we will continue with this tutorial to show you how we can accept extra information with our checkout form and give it a uniform view with Stripe Elements's components.
Whenever a user makes a payment, we can choose to sync the extra information the user has supplied with our Stripe account’s customer list. Doing this will ensure we always have the user's updated information for invoicing, order fulfillment, etc.
In our case, we would like to add the billing address information of the user to Stripe whenever they make a new payment if they don’t already have one in the database.
To do this, we will first have to make sure we can store that information in our database, so we will create a new migration to update the users table:
php artisan make:migration "add billing address to users table"This will create a new migration to update our users table, and there we can add the new fields we want to store.
Here we will be storing our users’ billing_address as a JSON column. All the data can be stored as an array in one column. The generated migration class should now look like this:
<?php

use Illuminate\\Database\\Migrations\\Migration;
use Illuminate\\Database\\Schema\\Blueprint;
use Illuminate\\Support\\Facades\\Schema;

class AddBillingAddressToUsersTable extends Migration
{
    /**
     * Run the migrations.
     *
     * @return void
     */
    public function up()
    {
        Schema::table('users', function (Blueprint $table) {
            $table->json('billing_address')->nullable();
        });
    }

    /**
     * Reverse the migrations.
     *
     * @return void
     */
    public function down()
    {
        Schema::table('users', function (Blueprint $table) {
            $table->dropColumn('billing_address');
        });
    }
}
Now that we have that, we will run our migration:
php artisan migrateTypecasting Our Column
To convert our new user property to the right type while retrieving and storing it in the database, we need to add a $casts property in our User model so the Laravel framework can handle that for us:
<?php

use Laravel\\Cashier\\Billable;

class User extends Authenticatable
{
    use Billable;

    protected $casts = [
        'billing_address'   => 'array',
    ];
}
As a Laravel developer, you should know that depending on the contents of your User model, you may have more fields in your $casts property. Now we will define an event listener on the update event of our User model. This event listener will handle syncing our customer data with stripe data each time the User model is updated:
<?php

...

use function Illuminate\\Events\\queueable;

/**
 * The "booted" method of the model.
 *
 * @return void
 */
protected static function booted()
{
    static::updated(queueable(function ($customer) {
        if ($customer->hasStripeId()) {
            $customer->syncStripeCustomerDetails();
        }
    }));
}
Next, let’s create our payment endpoints:
We need to make two endpoints:
/checkout/intent- Like the nameintentsignifies, we will inform Cashier (and, in essence, Stripe) of our intention to make a payment; this will generate some keys that we will pass to our frontend to make a payment./checkout/pay- This endpoint will help us to charge the user’s card and perhaps send a receipt.
In our api.php file, we will define these routes and map them to the controllers which will handle their actions:
<?php

use Illuminate\\Http\\Request;
use Illuminate\\Support\\Facades\\Route;
use App\\Http\\Controllers\\CheckoutController;

/*
|--------------------------------------------------------------------------
| API Routes
|--------------------------------------------------------------------------
|
| Here is where you can register API routes for your application. These
| routes are loaded by the RouteServiceProvider within a group which
| is assigned the "api" middleware group. Enjoy building your API!
|
*/

Route::group(['middleware' => ['auth:sanctum']], function () {
        Route::get('/checkout/intent', [CheckoutController::class, 'intent']);
        Route::post('/checkout/pay', [CheckoutController::class, 'pay']);
});
In the file above, we have defined our routes in the auth:sanctum middleware group since we will require an instance of the user to charge them, the auth:sanctum middleware is required. You can learn more about Sanctum on the official website.
Let’s create our controller:
php artisan make:controller CheckoutControllerOur controller looks like this:
<?php

namespace App\\Http\\Controllers;

use Illuminate\\Http\\Request;

class CheckoutController extends Controller
{
    //
}
Our first method is intent and this method is going to call a simple method provided by the Billable trait of Laravel Cashier to setup the intent to make payment. This will return an instance of Stripe\SetupIntent, which will contain a client_secret to help us charge the user’s card:
<?php

// app/Htpp/Controllers/CheckoutController
namespace App\\Http\\Controllers;

use Illuminate\\Http\\Request;

...

/**
 * Setup payment intent for this user
 *
 * @return Stripe\\SetupIntent
*/
public function intent(Request $request)
{
    $user = $request->user();

    return $user->createSetupIntent();
}
Now let’s look at our second method, which is pay. This will charge the user’s card and return an instance of Laravel\\Cashier\\Payment:
/**
 * Charge the user's card
 *
 * @return Laravel\\Cashier\\Payment
 * @throws \\Laravel\\Cashier\\Exceptions\\IncompletePayment
 */
public function pay(Request $request)
{
    $user           = $request->user();
    $paymentMethod  = $request->payment_method;
    $storeCard      = $request->storeCard;
    $cardholderName = $request->name;
                $address        = $request->billing_address;
    $amount         = $request->amount;

    try {
        $user->createOrGetStripeCustomer();
        $user->updateDefaultPaymentMethod($paymentMethod);
        $amount = $amount * 100; //convert to cent/kobo,etc
        $payment = $user->charge($amount, $paymentMethod);

        if ($payment->status === 'succeeded') {
            $user->billing_address = $address;
            $user->save();
        }

        return response()->json(['status' => 'success', 'data' => ['payment' => $payment]]);
    } catch (\\Throwable $th) {
        throw $th;
    }
}
This method does a couple of things:
- First, we retrieve the user input from the frontend; note that the example above doesn’t use validation since it’s only for demonstration purposes. You should always validate users’ input before using them in your code.
- Next, in the try-catch block, we will get our user as a Stripe object, update the default payment method and charge the user — all done with simple one-line functions for each action.
- You may apply extra logic in your application to not update the default payment method of the user each time you make a payment and use their existing payment method that can be stored from the
intentmethod. - We confirm that the Laravel cashier payment was successful by checking that the
statuskey of$paymentequals tosucceeded. There is a lot of other information packed inside of the Laravel\\Cashier\\Payment instance, which you may inspect to do other things like retrieving the receipt URL. - When the payment is successful, we update the
billing_addresswhich will fire the listener we set up in the booted method of our User model.
Building the Checkout Page

Here, we will use the Stripe elements to securely collect card details on our website plus other information like the billing_address we added in our migration above. We will also style our page with TailwindCSS to give the Stripe Elements and our extra fields a uniform look.
This may be a good time to mention that you should only collect card information on your website using a tool like Stripe Elements, ensuring your form is secure and safe. Also, this should only happen over SSL.
The template that makes up this page looks somewhat like this:
The stripe elements in this template are:
<div id="card-number" class="text-dark-800 focus:ring-2 border-input border outline-none px-4 rounded text-sm py-3" />
<div id="card-expiry" class="text-dark-800 focus:ring-2 border-input border outline-none px-4 rounded text-sm py-3" />
<div id="card-cvc" class="text-dark-800 focus:ring-2 border-input border outline-none px-4 rounded text-sm py-3" />
The important thing to note is the id on these elements, which we use to create instances of Stripe Elements:
this.cardNumber = this.stripeElements.create('cardNumber', { style })
this.cardNumber.mount('#card-number')
this.cardExpiry = this.stripeElements.create('cardExpiry', { style })
this.cardExpiry.mount('#card-expiry')
this.cardCvc = this.stripeElements.create('cardCvc', { style })
this.cardCvc.mount('#card-cvc')
We are using this base style object to style the elements' inner parts like invalid state and other base styles:
const style = {
  base: {
    color: 'black',
    fontFamily: '"Helvetica Neue", Helvetica, sans-serif',
    fontSmoothing: 'antialiased',
    fontSize: '14px',
    '::placeholder': {
      color: '#aab7c4'
    }
  },
  invalid: {
    color: '#fa755a',
    iconColor: '#fa755a'
  }
}
The TailwindCSS classes are then applied to our parts to customize the look and feel to match our other form inputs:
<input class="text-dark-800 focus:ring-2 border-input border outline-none px-4 rounded text-sm py-3">Next, we destroy each instance of Stripe Element we create when our page component is destroyed in the Vue lifecycle in the beforeDestroy hook:
beforeDestroy () {
  this.cardNumber.destroy()
  this.cardExpiry.destroy()
  this.cardCvc.destroy()
}
Charging the User's Card
Now, we will charge the user’s card when the pay button is clicked; our form will submit and fire the pay method:
methods: {
    async pay () {
      this.intent = await this.$axios.get('/checkout/intent')
      this.intent = this.intent.data
      const address = {
        address: this.billing_address,
        state: this.billing_state,
        country: this.billing_country,
        postal: this.billing_postal_code
      }
      this.$stripe.confirmCardSetup(this.intent.client_secret,
        {
          payment_method: {
            card: this.cardNumber
          }
        }
      ).then(async (result) => {
        const paymentMethod = result.setupIntent.payment_method
        await this.$axios.post('/checkout/pay', {
          name: this.cardHolderName,
          payment_method: paymentMethod,
          billing_address: address,
          amount: this.cartTotal
        }).then((result) => {
          // eslint-disable-next-line no-console
          console.log('Payment was successful ', result)
        })
      }).catch((err) => {
        // eslint-disable-next-line no-console
        console.log('An error occurred ', err)
      })
    }
  }
The first thing we do in this method is to make a GET to the /checkout/intent endpoint we created. This endpoint returns a client_secret which we then use to call the this.$stripe.confirmCardSetup() method, this method is called with the Stripe Elements’ cardNumber.
Once our Stripe card is set up, it returns a payment_method which is a Stripe token version of our card. Next, we send a POST request to the /checkout/pay endpoint with the payment_method, billing_address, name, and amount.
Remember that our billing_address field is a JSON column in the database, so we create that as an object and send it to our API.

Final Words
Laravel Cashier offers a lot of powerful methods to use Stripe in your Laravel application; we’ve only covered a few here, but PHP developers know that in combination with the Stripe Elements library, one can securely collect payment information from users without sacrificing UX by applying a little bit of styling.
Laravel cashier Stripe and Nuxt.js is certainly the way to go because of the powerful ways to achieve the desired results, so don't waste any more time and start applying these beneficial tips right away!
