
Building APIs and user interfaces with JavaScript can be an advantage for small and large teams. However, building easy-to-deploy and scalable Node.js APIs to power your frontend, web, or mobile application is not an easy task for any Node.js developer.
This article will teach you how to build scalable and production-ready Node.js web API using Sails.js framework - an MVC framework for Node.js. We will be building user management endpoints for a web API service. We will create endpoints for the following features:
- User registration
- User login
- Forget/reset password
Let's get started by first introducing Sails.js.
Table of contents
Prerequisites
To better understand this article, knowledge of server-side development and Node.js is necessary.
What Is Sails.js?
Sails.js or Sails is a real-time MVC framework for building scalable production-ready Node.js applications. Created by Mike McNeil in 2015, Sails.js takes inspiration from Ruby on Rails MVC framework.
It comes out of the box with features like:
- Websockets - This is used for real-time communication and is suitable for real-time chat apps and more.
- Waterline - An ORM for Node.js is used for a data layer of your application to make it faster and more scalable.
- A CLI tool, Sails, that aids you to scaffold a new sails application, generate boilerplate to speed up development server, controller actions, and database migration.
Organizations and companies like Microsoft, Philips, Amazon, and Verizon currently use Sails to build web APIs for their various clients.
It's important to note that Sails is built on top of Express.js, a framework of Node.js.
Getting Started
To get started with web API in Sails, you will need to install the Sails CLI tool. To do this, you will use the command below:
npm install -g sailsThe code block above will install Sails CLI globally on your local machine. To verify that Sails is installed, you can run the code block:
sails -vThe code block above would return a version number if the install was successful.
Creating a New Sails Application
To create a new application with Sails, let's run the command below:
sails new {project name}The command above takes in flags; this is used to tell Sails what boilerplate code to generate for our application. So let's run the code block below on our terminal to create a new Sails app:
sails new sails_api --no-frontend --fastThe command above is used to create a new Sails application; the --no-frontend is used to tell Sails, not to generate assets and views. The --fast flag is used to create a Sails app and skip dependency installations.
cd into your project directory and open the application in your text editor of choice. We can do this using the command below:
cd sails_api && code .Your project structure should look like the image below.

The image above is boilerplate code generated by Sails for building web APIs; some of the files in the directory include:
- API: Perhaps the most used file in Sails, is where you will be creating most of your API logic; it contains controllers, models, and helpers subdirectories.
- controllers: This is where you add controllers for your application.
- helpers: This folder contains helper functions for your application. Helpers are reusable code that follows the node-machine specification.
- models: This contains your waterline models, which are also database schemas.
- config: This is where you define your app configurations; inside, it is where you define your `routes`, your database adapter for Waterline, and your policies and actions.
You can learn more about Sails files and directories from Sails docs here.
Creating Our User Endpoint
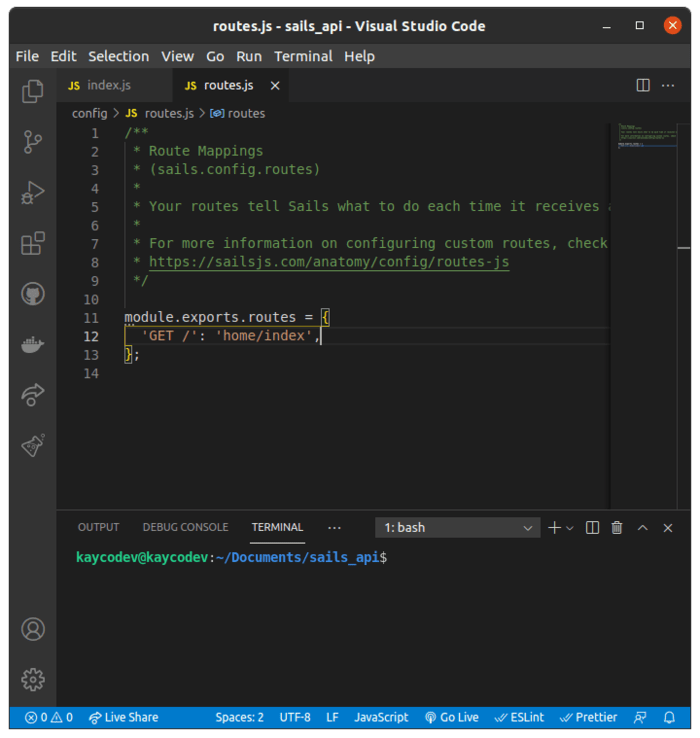
In this section, we will create our user endpoint to do this. First, navigate into your config/routes where we will be defining the request type and location. So open your config/routes.js and add the code block below:
"GET /": "home/index"The code block above is for a GET request assigned to the index action in the home controller that will handle this request.
Our routes.js file should look like the image below:
Next, let's create an action for our index request. To do this, we will use Sails to create a controllers/home directory by running the code block below:
sails generate action home/indexThe code snippet above will create a home folder in the controllers directory, and an index action should be in it. The index.js should look like the image below:
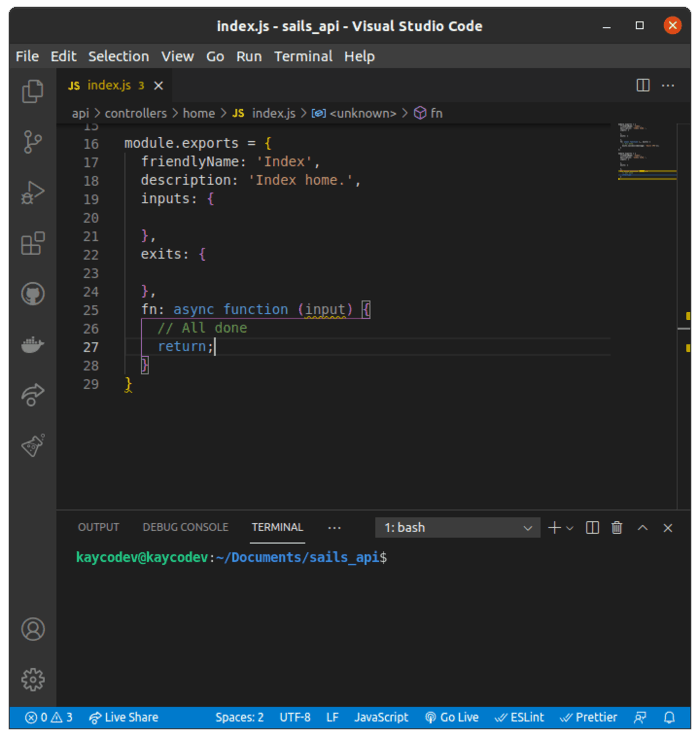
To complete our home route, we need to add a response when a request is made to the `/` endpoint. Update your home/index.js file to look like the code block below:
module.exports = {
  friendlyName: 'Index',
  description: 'Index home.',
  inputs: {
  },
  exits: {
  },
  fn: async function (_, exits) {
    // All done.
    exits.success({message: 'Sails API'});
  }
Sails uses the exits.success method to return a success response for a request. With this, a JSON message is sent as a response when a user visits the `/`route.
Create a New User Endpoint
In this section, we will be doing the following:
- Setup database connection and create a new user
- Store the user in the database
- Create an error handling process in case of errors
Setting Up the Database Connection
We will be using MongoDB. You can check out this tutorial on how to install MongoDB on your machine.
Sails comes with an official adapter for MongoDB for Waterline which we will use. You can install the adapter using the command below:
npm install sails-mongoNext, we need to add the name of the adapter and our database connection to our config/datastore.js.
You should have created your Mongo database before now, if you haven't, you can check this link for help.
Update your config/datastore.js file to look like the code block below:
default: {
  adapter: 'sails-mongo',
  url: 'mongodb://sails_api/@localhost:3324/sails_api' //you can add your own database url here
}
After you've done this, navigate to your config/models.js and uncomment the code snippet below:
id: { type: 'string', columnName: '_id' }If you've done this, restart your development server by running sails lift.
Moving on, let's create a Schema for our user model in the section.
Creating User Model Schema
To create a schema in a Mongo database, we will use Mongoose. For our users collection, we will need the following documents: full name, email, and password. To create a user model, let's run the command below:
sails generate model userThe above command will create a file in the models directory called User.js. Inside the file, we will add the code block below:
var mongoose = require('mongoose');
bcrypt = require('bcrypt');
SALT_WORK_FACTOR = 10;

var UserSchema = new mongoose.Schema({
  fullName: {
    type: String,
    required: true
  },
  email: {
    type: String,
    required: true,
    unique: true
  },
  password: {
    type: String,
    required: true
  }
}, {timestamps: true});

UserSchema.pre('save', function(next) {
  var user = this;
  // only hash the password if it has been modified (or is new)
  if (!user.isModified('password')) {return next();}
  // generate a salt
  bcrypt.genSalt(SALT_WORK_FACTOR, (err, salt) => {
    if (err) {return next(err);}
    // hash the password using our new salt
    bcrypt.hash(user.password, salt, (err, hash) => {
      if (err) {return next(err);}
      // override the cleartext password with the hashed one
      user.password = hash;
      next();
    });
  });
});
UserSchema.methods.comparePassword = function(candidatePassword, cb) {
bcrypt.compare(candidatePassword, this.password, (err, isMatch) => {
if (err) {return cb(err);}
cb(null, isMatch);
});
};
module.exports = mongoose.model('User', UserSchema);Using the Mongoose schema attribute, we defined the schema for our User schema. The last function is to encrypt a user's password before we store it.
UserSchema.pre('save', function(next) {
  var user = this;
  // only hash the password if it has been modified (or is new)
  if (!user.isModified('password')) {return next();}
  // generate a salt
  bcrypt.genSalt(SALT_WORK_FACTOR, (err, salt) => {
    if (err) {return next(err);}
    // hash the password using our new salt
    bcrypt.hash(user.password, salt, (err, hash) => {
      if (err) {return next(err);}
      // override the cleartext password with the hashed one
      user.password = hash;
      next();
    });
  });
});
To add a createAt and updateAt, we added MmongoDB's timestamps: true.
If you've done all these steps, run sails lift to start our development and see our changes.
Creating Create User Controller
So we have our user models setup.
The next step is to create a route and a controller also known as an action for creating new users. First, let's start with creating a route for it in our routes.js file below:
'POST /user/register': 'user/register'To create a register user action, run the command below:
sails generate action user/registerAfter we've done this, we need to define the data in the input field of our POST request, so add the code snippet below in your input:{}.
inputs: {
    fullName: {
      type: 'string',
      required: true,
    },
    email: {
      type: 'string',
      required: true,
      unique: true,
      isEmail: true,
    },
    password: {
      type: 'string',
      required: true,
      minLength: 7,
    },
  }
In the code above, we added validation properties to the inputs. The next step is to add exits which are the results for an endpoint. To add responses to our requests, add the code block below to your exits:{} in our register.js file:
exits: {
    success: {
      statusCode: 201,
      description: 'New user created',
    },
    emailAlreadyInUse: {
      statusCode: 400,
      description: 'Email already in use!',
    },
    error: {
      description: 'Something went wrong, try again',
    },
  },
It's important to note that before you use the fn async function in Sails: this is for catching errors. Next, let's create a user record below. Add the code block below after your exits:{} function.
fn: async function (inputs, exits) {
    // All done.
    try {
      const newEmailAddress = inputs.email.toLowerCase();
      let newUser = await User.create({
        fullName: inputs.fullName,
        email: newEmailAddress,
        password: inputs.password,
      });
      return exits.success({
        message: `${newUser}}account created successfully`,
      });
    } catch (error) {
      if (error.code === 'E_UNIQUE') {
        return exits.emailAlreadyInUse({
          message: 'Oops :) an error occurred',
          error: 'This email already exits',
        });
      }
      return exits.error({
        message: 'Oops :) an error occurred',
        error: error.message,
      });
    }
  },
In the code above, we added email validations and responses for our exits requests. We will build our login endpoint in the next section.
Creating Login Endpoint
To create a login endpoint, first, we need to add a route for it in our routes.js file. Let's do that below:
POST /user/login': 'user/loginTo create a user login endpoint, we will need to make sure that the user's email is registered. Run the command below in your terminal to create login actions:
sails generate action user/loginTo make sure that an email address is registered, we will need a policy called can-login.js in our policies directory. You can find out more about policies here.
module.exports = async function (req, res, proceed) {
  const { email } = req.allParams();
  try {
    const user = await User.findOne({ email: email });
    if (!user) {
      res.status(404).json({
        error: `${email} not found`,
      });
    } else {
      return proceed();
    }
  } catch (error) {
    res.status(401).json({ error: error.message });
  }
};
In the code block above, we use Node.js findOne method to look for emails provided by the user on login. If the user isn't found in our database, we will return a 404 error code and message that the email not found. We also added a catch method in case an error occurs during the process.
Writing API Policy
Policies, according to the Sails documentation, are added tools for authorisation and access control. Finally, we will create a policy that works with our action in our API. Let's add the code block below to our policies.js file:
"user/login": 'can-login'Now add the inputs and exits to your inputs:{} and exits:{} object:
inputs: {
    email: {
      type: 'string',
      required: true,
    },
    password: {
      type: 'string',
      required: true,
    },
  },

  exits: {
    success: {
      description: 'Login successful',
    },
    notAUser: {
      statusCode: 404,
      description: 'User not found',
    },
  },
Similar to our last policy, we will use an fn function with a try/catch method to first; find the user with the email, add an exit for when the user is not found; second, check the password of the user and an exit for when the user password is correct. Let's implement these below:
 fn: async function (inputs, exits) {
    try {
      const user = await User.findOne({ email: inputs.email });
      if (!user) {
        return exits.notAUser({
          error: `${inputs.email} not found`,
        });
      }
await sails.helpers.passwords
.checkPassword(inputs.password, user.password)
.intercept('incorrect', (error) => {
exits.passwordMismatch({ error: error.message });
});
return exits.success({
message: `${user.email} is logged in`,
data: user,
token,
});
} catch (error) {
sails.log.error(error);
if (error.isOperational) {
return exits.operationalError({
message: `Error logging in user ${inputs.email}`,
error: error.raw,
});
}
return exits.error({
message: `Error logging in user ${inputs.email}`,
error: error.message,
});
}
}For a successful exit, we returned a message that the user is logged in, and in the case of errors again, we used the try/catch method.

Conclusion
In this post, we have learned how to create APIs with Node.js framework Sails.js. You can extend this application by adding authentication and deploying it to any provider of your choice.
You can find the source code for this article on GitHub.
And if you want to keep up with new trends, add these blog posts to your reading list:
