
Node.js and Docker are probably the most uttered words these days in the web development scene and rightfully so. Both of these technologies have brought about changes so big that they can be considered evolutions.
Yet, so many Node.js developers struggle to containerize their Node.js application with Docker efficiently.
In this article, you’ll not only learn about putting your application inside an image but also optimize that image to have a very small size and high stability. You’ll also learn about working with networks, volumes, and docker-compose.
Let's dive in!
Table of contents
Prerequisites
This article assumes that you have experience working with Node.js and have developed APIs using Express.js in the past. Most of the work throughout this article will be done in a terminal and all the containers will be Linux containers so having familiarity with one of the distros will help.
The focus of this article will be on containerizing Node.js applications and will assume that you already have Docker installed on your system and basic knowledge of working with the tool. If you’re looking for a resource that’ll teach you Docker from the ground up, The Docker Handbook is highly recommended.
Project Code
This is a project-based article. You’ll work with a simple notes application API powered by Express.js and PostgreSQL. The code can be found on the fhsinchy/docker-handbook-projects GitHub repository.
Just make a fork and clone that on your local system. Make sure you’re on the master branch and open the notes-api directory from this repository in your favorite code editor. I prefer Visual Studio Code with the official Docker Extension.
Containerizing a Node.js API
Let me give you an overview of the notes-api project.
This is a very simple notes application that lets you create, read, update, and delete notes from the database.
There is no hassle of authentication whatsoever. The application is powered by Express.js and uses PostgreSQL as its database system. It uses Knex.js as the query builder and Objection.js as the object-relational mapper.
The project structure is as follows:
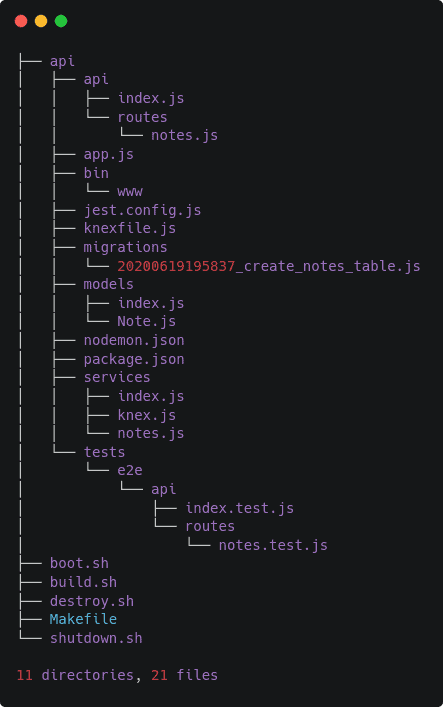
The api subdirectory contains the application source code. The boot.sh, build.sh, destroy.sh, shutdown.sh, and Makefile will come into action later in this article. For now, just ignore them.
Before you start to write the necessary code for containerizing this application, plan out the individual steps.
In my opinion, the containerization process of this application should have the following steps:
- Get a good base image for running JavaScript applications, like node.
- Set a working directory other than the root.
- Copy the package.json file into the image.
- Install necessary dependencies.
- Copy the rest of the project files.
- Start the server by executing the
npm run startcommand.
Let’s implement these steps in code. Create a new file notes-api/api/Dockerfile with the following content:
FROM node:lts

WORKDIR /app

COPY ./package.json .
RUN npm install

COPY . .

CMD ["npm", "run", "start"]
A Dockerfile is a collection of instructions that the Docker daemon uses to build a new image. Images are multi-layered self-contained files that act as the template for creating containers and each line of Dockerfile will create a new layer of the resultant image. The explanation for each of these lines are as follows:
- The
FROMinstruction sets the officialnode:ltsimage as the base for the resultant image granting it all the capabilities necessary for running any JavaScript application out there. - The
WORKDIRinstruction sets/appas the working directory for this image. By default, all the images use the root as their working directory. If you do not set it to something else, in the beginning, then all the project files will be sprayed all over the container root, which is not a good thing. - The first
COPYinstruction of this file copies the package.json file from the local directory to the image’s working directory. - The
RUNinstruction executes thenpm installcommand inside the image working directory and installs all the necessary dependencies. - The second COPY instruction copies everything from the local project directory to the image’s working directory.
- Finally, the
CMDinstruction sets the default command for this image to benpm run startso that when you start a container using this image, it starts the application server automatically.
To create a new image from this Dockerfile, open your terminal inside the notes-api/api directory and execute the following command:
docker image build --tag notes-api .The docker image build command is used for creating new images from a Dockerfile. The --tag option assigns a human-readable name to the image. If you do not tag the image manually Docker will assign a random string as the name. The . at the end of the command sets the current directory as the context of this build.
During the build process, the Docker daemon will have access to the files within the build context. All the files that should be included in the image along with the Dockerfile must exist in the build context.
There is also a file notes-api/api/.dockerignore that contains the list of files and directories that should not be included in the image. The syntax of the file is identical to the .gitignore files:
.git
*Dockerfile*
*docker-compose*
node_modules
Depending on your internet connection and computer, the build process should finish within a few minutes. The output from the command should look as follows:
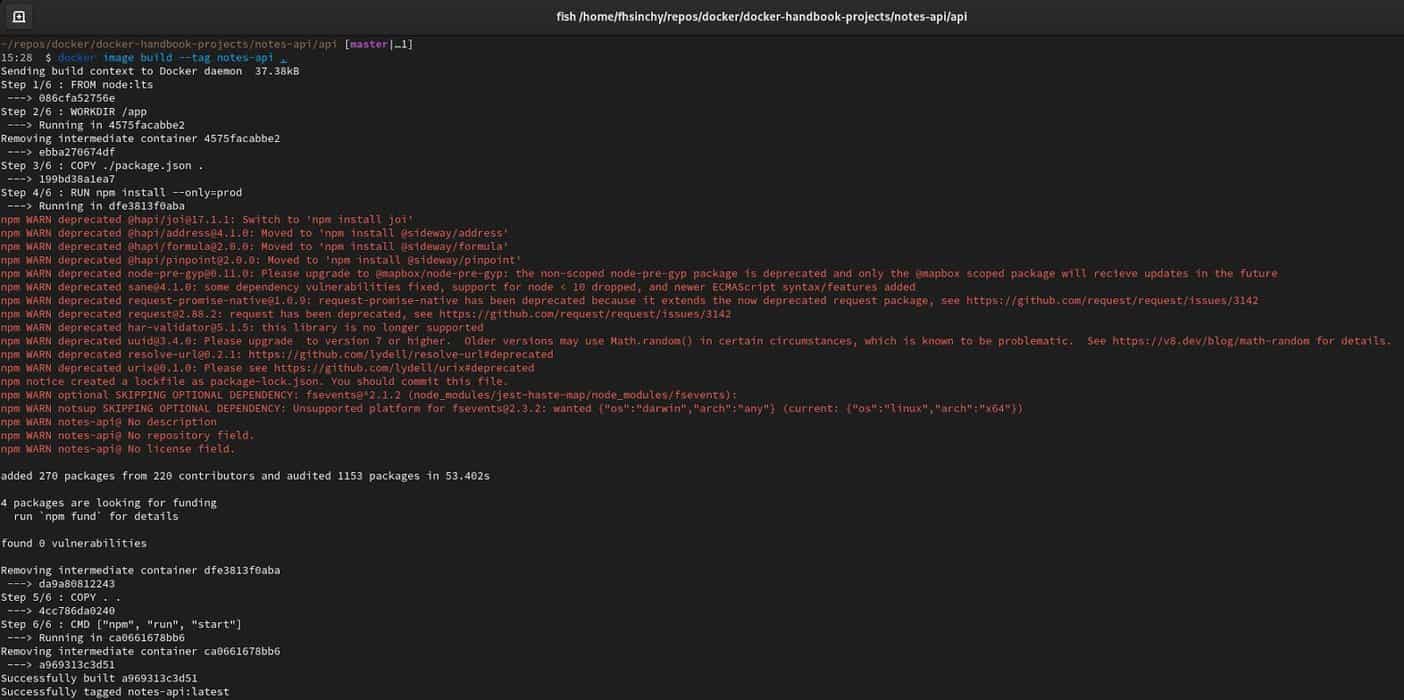
As you can see, a new image has been built. The image can be identified using the image id a969313c3d51 or the image tag notes-api:latest. The image id will be different on your machine but the tag will be the same as mine. To start a new container using this image, execute the following command:
docker container run --rm --name notes-api --publish 3000:3000 notes-api:latest
The docker container run command is used for creating and starting a new container from an image. The --rm option indicates that the container should be removed when stopped. The --name option allows you to set a custom name for this container. If you omit this option, Docker will assign a randomly generated name to the container.
The --publish option allows you to map a port from the container to a port on your local system. The application inside the container runs on port 3000 by default. So by writing --publish 3000:3000, you’re mapping port 3000 inside the container to port 3000 on your local system, where the left one is the host system port and the right one is the container port. If you write --publish 3030:3000 then port 3000 from the container will be mapped to port 3030 on the local system.
The notes-api:latest is the image name and it has to come as the last argument of this command. Output from this command should be as follows:
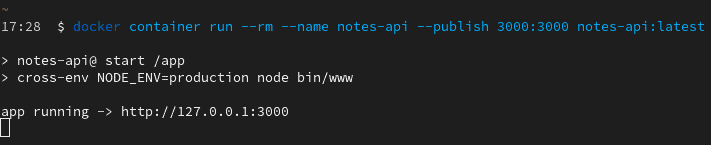
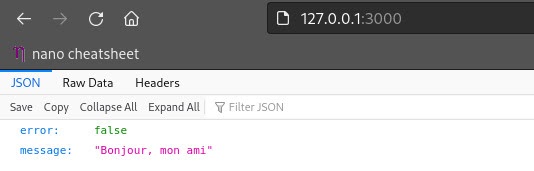
You should be able to access the API on http://127.0.0.1:3000 from your browser:
But if you navigate to http://127.0.0.1/notes, you’ll face the following error:
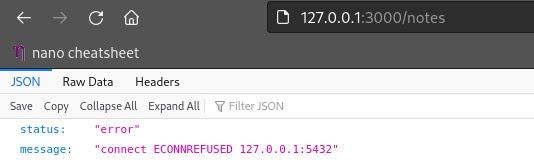
This is happening because the API is failing to make a connection with a database. The API is getting an ECONNREFUSED or ERROR CONNECTION REFUSED on port 5432, the default port for PostgreSQL. In the next section, you’ll learn about cross container connection in Docker using Docker Networks.
Connecting to a Database Container
The notes-api application uses PostgreSQL as its database system. Running a PostgreSQL container using the official postgres image is very simple.
docker container run --rm --detach --name=notes-db --env POSTGRES_DB=notesdb --env POSTGRES_PASSWORD=secret postgres:12That’s all it takes. The detach command will start the container as a background server so that you don’t have to keep the terminal open. The --env option allows you to pass environment variables to the container. The POSTGRES_DB environment variable is optional but the POSTGRES_PASSWORD environment variables are required by the server.
Now that you have a PostgreSQL server running, you may think that you can publish the PostgreSQL container on port 5432 of the local system and connect to http://127.0.0.1:5432 from the API but that’s plain wrong.
The problem with containers is that they are completely isolated environments and http://127.0.0.1 or http://localhost inside a container refers to the container itself. So if you try to connect to http://127.0.0.1:5432 from the notes-api container, it will not find the notes-db container.
The ideal way for connecting two containers in Docker is by using a user-defined bridge network. A network is a logical object just like a container or an image in Docker. To create a new network in Docker, execute the following command:
docker network create notes-networkYou’ll see a long string printed out on the terminal as output. You can list networks using the docker network ls command remove them by executing the docker network rm NETWORK_NAME command.
To attach the database container to this network, execute the following command:
docker network connect notes-network notes-dbThe command will not yield any output. To check if the container has been added to the network or not, execute the following command:
docker network inspect --format='{{range .Containers}} {{.Name}} {{end}}' notes-networkIf you see notes-db in the output, that means the container has been added to the network. You can use the docker network detach NETWORK_NAME CONTAINER_NAME command to detach a container from a network.
Now it’s time to connect the notes-api container to this network. To do so, stop the previously running notes-api container by hitting Ctrl + C twice on the terminal window or closing the terminal window completely.
Create and start a new container by executing the following command:
docker container run --rm --detach --name notes-api --publish 3000:3000 --network notes-network --env DB_HOST=notes-db --env DB_DATABASE=notesdb --env DB_PASSWORD=secret notes-api:latestThe --network option lets you attach this container with a network from the beginning. The DB_HOST, DB_DATABASE, and DB_PASSWORD environment variables are required by the API for connecting to the database server. The DB_HOST refers to the database server endpoint.
One of the benefits that a custom bridge network provides in Docker is automatic DNS resolution between containers which means, as long as two containers are on the same network, they can connect to each other by simply using their names. Docker will replace the container name with the proper IP address when needed.
Two things that you have to remember when connecting multiple containers are:
- The containers must have custom names. Randomly generated names by Docker will not work.
- The network has to be a user-defined bridge network. The default bridge network will not provide automatic DNS resolution.
The different types of networks that Docker has are out of the scope of this article. If you want to learn about them, however, I’ll leave links at the end of this article.
Now to make sure that both the notes-api and notes-db containers are indeed attached to the notes-network network, execute the following command:
docker network inspect --format='{{range .Containers}} {{.Name}} {{end}}' notes-networkIf you see the names of both containers show up in the output, that means both of them have been attached to the network. The final step to make the database work is running the migrations. To do so, execute the following command:
docker container exec notes-api npm run db:migrateThe docker container exec command allows you to execute commands inside a given container. The npm run db:migrate command creates all the tables in the database. If everything goes fine, the output from the command should be as follows:
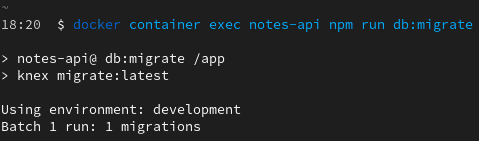
If you see any error, that means you may have made some mistake. Recheck all the steps and make sure you haven’t mistyped anything or missed any of the environment variables.
Persisting Data in Volumes
The work you’ve done so far is solid but there is one problem. If you stop the database container, Docker will remove it from memory along with all the data. This is not expected behavior.
For these kinds of scenarios, you can make use of named volumes. These volumes let you persist container data outside of the container so as long as you don’t delete the volume, the data will persist regardless of whether the container exists or not.
Volumes in Docker are logical objects like Containers or Networks. You can create a new volume by executing the following command:
docker volume create notes-db-dataYou’ll get the name of the volume as output. You can list all the volumes in your system by executing the docker volume ls command.
You can not attach volumes to containers that are already running. First, stop the notes-db container by executing the docker container stop notes-db command and then run a new container with a volume by executing the following command:
docker container run --rm --detach --name=notes-db --env POSTGRES_DB=notesdb --env POSTGRES_PASSWORD=secret --volume notes-db-data:/var/lib/postgresql/data postgres:12The data from the database are usually persisted in the /var/lib/postgresql/data directory on the container filesystem. So if you mount this directory to the notes-db-data volume, the data will be tucked away inside that volume instead of the container filesystem. If you ever want to get rid of this volume, you can do that by executing the docker volume rm VOLUME_NAME command.
Optimizing Your Image
You’ve already learned about containers, images, networks, and volumes. In this section, you’ll learn about optimizing your image to have better stability and smaller size.
First, let’s have a look at the size of the unoptimized notes-api image size by executing the docker image ls command.
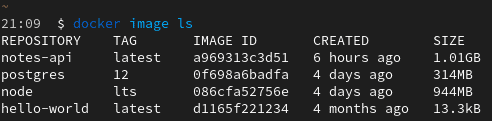
As you can see, the notes-api is 1.01 gigabytes in size which in my sense is insane for an application so small. The reason behind this gigantic image size is due to all the unnecessary stuff in the image. The node:lts image is based on the Debian Stretch image which itself is quite large.
One way to solve this issue is using a smaller base image like node:lts-slim or the node:lts-alpine image. The slim images are also based on Debian Stretch but have fewer preinstalled programs. The alpine-based images on the other hand are the smallest. Alpine Linux is a lightweight, secure Linux distribution made for containers. Let’s update the Dockerfile to use Alpine Linux instead.
Open the notes-api/api/Dockerfile and update its content as follows:
FROM node:lts-alpine

# install dependencies for node-gyp
RUN apk add --no-cache python make g++

ENV NODE_ENV=production

USER node
RUN mkdir -p /home/node/app
WORKDIR /home/node/app

COPY ./package.json .
RUN npm install

COPY . .

CMD [ "node", "bin/www" ]
There are several changes in the updated code. Instead of the node:lts image, you’re now using node:lts-alpine image. A lot of the Node.js packages require a working C++ toolchain and a python installation to be compiled. The first RUN command installs g++ and python in the image.
Just like apt in Ubuntu, Alpine uses apk for package installation. The ENV instruction sets the NODE_ENV environment variable to production by default. The USER instruction sets the default user for this image. By default, all Docker containers run as the root user. Using the root user by default is not only insecure but also causes stability issues for Node.js.
The solution to this problem is using a different user. The node user comes by default in the base image. The non-root user doesn’t have write access to any directory except its home directory. The home directory for any user in a Linux-based system is /home/USERNAME and that’s why the WORKDIR instruction now sets the /home/node/app directory as the working directory. The second RUN command simply creates the aforementioned directory using the mkdir program.
The rest of the code is almost the same except for the CMD instruction. Instead of using an npm script, you’re using node to bootstrap the notes-api/api/bin/www script. This allows the operating system signals to reach the node executable directly instead of getting consumed by npm. This is why you had to set the NODE_ENV environment variable to production manually this time. The previously used npm script sets the variable during execution automatically.
Rebuild the image by executing the docker image build --tag notes-api . command and check the size by executing the docker image ls command.
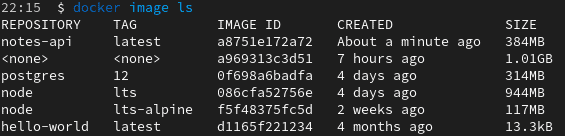
As you can see the image size has come down to 384 megabytes. More than 600 megabytes less. But it can be smaller by implementing a multi-stage build.
# stage one
FROM node:lts-alpine as builder

# install dependencies for node-gyp
RUN apk add --no-cache python make g++

WORKDIR /app

COPY ./package.json .
RUN npm install

# stage two
FROM node:lts-alpine

ENV NODE_ENV=production

USER node
RUN mkdir -p /home/node/app
WORKDIR /home/node/app

COPY . .
COPY --from=builder /app/node_modules  /home/node/app/node_modules

CMD [ "node", "bin/www" ]
Instead of building the image one go, you’re dividing the process into two steps. The first step is the builder step. You use node:lts-alpine as the base, install all necessary build tools, set /app as the working directory and install all the dependencies. That’s the end of stage one.
The second stage also uses node:lts-alpine as the base. This stage is almost identical to the previously written single-stage Dockerfile. Instead of copying the package.json file and installing the dependencies, you copy the node_modules directory from the builder step and use that here. This allows you to skip the installation of all the unnecessary build tools. After building the image, Docker will discard the contents of the first stage.
Rebuild the image by executing the docker image build --tag notes-api . command and check the size by executing the docker image ls command.
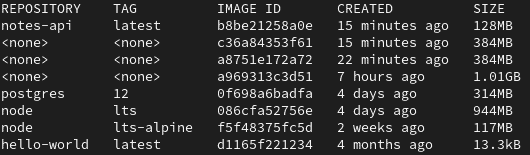
As you can see, the resultant image is now only 128 megabytes in size which is only 12% of the initial image size, 1.01 gigabytes.
Writing Helper Scripts
Managing the different containers, networks, and images manually while working on a multi-container project can become hectic. One way to make things easier is by writing some helper scripts. The notes-api project comes with some helper scripts by default. These are as follows:
- The build.sh script is responsible for building the images, creating the network, containers, and volumes. The script also starts the containers once they are created.
- The destroy.sh script is responsible for destroying all the resources created by the build script.
- The shutdown.sh script on the other hand will only stop the running containers, not remove them.
- The boot.sh file can restart containers stopped by the shutdown script.
I won’t get into explaining all these shell scripts. These are optional and if you’re familiar with writing shell scripts, go ahead and take a look at them.
Making Things Easier With Docker Compose
So far you’ve seen how you can containerize a Node.js application efficiently. In this section, you’ll learn about setting up a proper Docker Compose configuration file to make working with the application locally easier.
Docker Composer is another tool that makes working with multi-container projects a breeze. Instead of creating containers and connecting them manually, you write all the configurations inside the YAML file and Docker Compose will read the file and boot up the containers for you.
Create a new file notes-api/docker-compose.yaml with the following content:
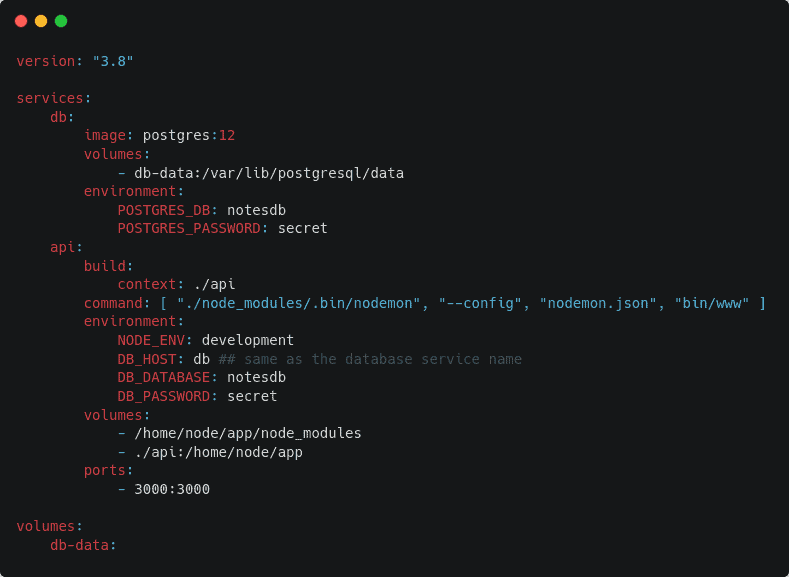
Every valid docker-compose file starts with the file version number. At the writing of this article, the latest version was 3.8. You can always have a look at the official reference to find out what’s the latest.
The services section contains definitions for the different containers for this project. There are be two containers in this project. The db container and the api container.
The definition for the db container is identical to the command you used to start the database container in a previous section. Instead of creating the volume manually, you define it under the volumes section.
The api container uses the ./api directory as the build context. The default command of the image has been overridden by a new one. In development mode, the application uses nodemon to reload the application automatically on code changes.
The environment variables are self-explanatory. Under the volumes section, there are two entries. The first one is an anonymous volume. Writing /home/node/app/node_modules basically instructs Docker to tuck away the content of nodes_modules directory to somewhere else than the container filesystem.
The second one is a bind mount. By writing ./api:/home/node/app you’re instructing Docker to map the content of the /api directory from the local filesystem to the /home/node/app directory inside the container. This allows code changes on the local filesystem to be reflected inside the container instantly. If you do not put the node_modules inside an anonymous volume, its content will be overridden by the bind mount.
Open your terminal on the notes-api directory and execute the docker-compose up --detach command to start the containers. Docker-compose will build the image if necessary. If you want to force image rebuilding you can use the --build option for the docker-compose up command.
To stop running containers execute the docker-compose stop command and to destroy the containers along with the volumes, execute the docker-compose down --volume command. You can migrate the database by executing the docker-compose exec api npm run db:migrate command once the containers are up and running.
If you have working experience with GNU Make, you can call the functions defined in the notes-api/Makefile by following the make FUNCTION_NAME command syntax. So executing make dev-start command will invoke the dev-start function.

Conclusion
I would like to thank you for the time you've spent reading this article.
I hope you've enjoyed it and have learned some useful stuff regarding Node.js and Docker.
If you want to learn Docker from the ground up, consider checking out my open-source Docker Handbook with tons of fun content and several practical projects.
And if you fancy staying up-to-date with other topics from the Node.js world, here's what to read next:
