
In this tutorial, you will learn by doing. You will identify accessibility issues in a pre-built Svelte application using both Axe-core DevTools and PA11Y. By the end of this post, you'll know how to set up a workflow to continuously check for accessibility each time a change is pushed to GitHub.
Goal
After going through this tutorial, readers will:
- have an understanding of what Web Accessibility is
- scenarios where it can be beneficial to users
- how to automate checks for accessibility using PA11Y and GitHub Actions
Note: Although the demo web application used in this article was built using Svelte, the knowledge learned from this article can be applied when building a web application with other frameworks.
To make this tutorial easy to navigate, it has been broken down into the following sections. You can either follow through in the order they appear below or move to any section that interests you the most.
Table of contents
Prerequisites
To follow along with this tutorial, it is expected that you satisfy the following requirements:
- Basic knowledge of version control using GitHub.
- Basic knowledge of existing HTML tags.
- Have the NodeJS runtime installed on your local machine.
- Have either yarn or npm installed locally as a package manager.
Introduction
Web Accessibility, often shortened as (A11Y), refers to the user-friendliness of a web application to all people. It includes people who have a permanent physical disability, such as the loss of an arm, and those whose present condition makes them temporarily disabled, such as an individual viewing a website while nursing an infant.
Several statistical reports show that a large percentage of the world’s population is living with various forms of disabilities. Implementing the guidelines for web accessibility in software development could be a great way to increase your application’s user base. Getting Started
Before you proceed to improve the accessibility of your web application, it would be quite helpful to understand some commonly used terminologies relating to web accessibility.
Web Accessibility Terminologies
Below is a list of three frequently used terminologies within this article:
- World Wide Web Consortium (W3C)
The World Wide Web Consortium, often shortened to (W3C), is a body of organizations, formed to achieve the common goal of developing guidelines and standards that ensure the long-term progress and usage of the web.
- Web Content Accessibility Guidelines (WCAG )
Web Content Accessibility Guidelines, often shortened to ( WCAG ), was created by the World Wide Web Consortium to provide a common standard for web accessibility that meets the needs of individuals, organizations, and governments internationally.
- Accessibility Rule sets
Accessibility rule sets are a set of explicit regulations and ethics governing the procedure of building accessible web pages. These guidelines define how to make Web content more accessible to people with disabilities.
An example rule is the page-has-heading-one rule. It requires that a “page must contain a level-one heading”. Meaning that the page should contain an h1 element that appears before the start of the main content. Applying this rule allows screen readers to use keyboard shortcuts to navigate the entire page structure.

Getting Started with Web Accessibility Checks
Modern browsers today have extensions or add-ons which allow users to run an accessibility check on the target web application to find and fix accessibility issues outlined in the generated report.
An example is the axe DevTools built by Deque Systems, which can be installed from the Chrome Web store and Firefox Marketplace for Chrome and Firefox desktop browsers respectively.
Testing the accessibility of a web application can also be automated and performed as a part of a Continuous Integration workflow, each time a new change to the web application is made and pushed to a version control system such as GitHub. Some automation tools built for this purpose are:
- Axe-Core built Deque Systems.
- PA11Y.
- Automated Accessibility Testing Tool ( AATT ) built by PayPal.
In the next section, you will clone a prebuilt Svelte Web Application that was built for the recently concluded International Women's Day Celebration. While this application looks great, it has poor support for accessibility. You will run an accessibility check using the axe DevTools from your browser and the PA11Y automation tool to find and fix accessibility issues.
Demo Application
The demo application is a Single Page Application with only a homepage for displaying a list of heroines.
- To begin, clone the application using Git from your command line.
git clone https://github.com/vickywane/adeva-svelte-a11y-article.git
- Move into the newly cloned project and install the application’s dependencies:
# change directory
cd adeva-svelte-a11y-article

# install application dependencies
npm install
At this point, you have the application fully set up on your computer. Now, you can start the application using the npm dev command and view the application home page through your web browser at http://localhost:3000.

Checking for Accessibility
Svelte is built with first-class support for accessibility. Whenever an element is missing a tag that aids accessibility, Svelte prints a warning to the console that recommends adding the missing tag to the affected element.
Have a look at the terminal where the application is running to see if there are any accessibility-related warnings:
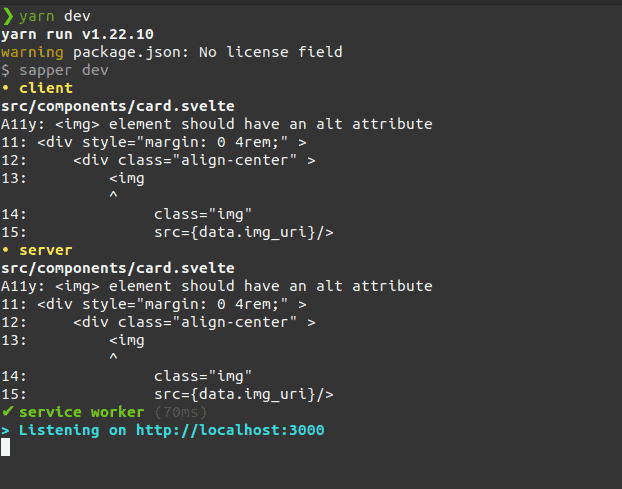
From the terminal output above, the accessibility warning is being thrown by Svelte due to the missing Alt attribute in the img tag in the card component.
The text value of the alt attribute is displayed by the browser as a fallback in scenarios where an image cannot be loaded, either due to the image link being invalid or network error. The text is also read out by screen readers when reading a web page containing an image.
Using your preferred code editor, open the card.Svelte file in components directory and add an alt attribute to the img tag in the file as shown in the code snippet below:
<img alt={data.name} class="img" src={data.img_uri}/>In the snippet above, an alt attribute has been added to the image element, and it would contain the name of the heroine being passed to the card a prop from the home component.
Save the card.Svelte file and have a look at the terminal running the Svelte application. You would observe that all accessibility warnings have been cleared out.
Using axe DevTools
- If not installed, install the axe DevTools extension from the Chrome web store to your Chrome or Firefox desktop browser.
- Next, from your browser, navigate to the running Svelte application at http://localhost:3000, and launch using the browser DevTools using the ctrl + shift + I key combination for Linux and Windows operating systems and Cmd + Opt + I for macOS operating system.
- From the developer tools console, click the axe DevTools tab to access the recently installed extension.
Being in the axe DevTools default page, click on the “Scan All Of My Page” option to scan the current page opened in the browser. The axe DevTools extension would scan the page and generate a report containing accessibility issues identified on the current page.
After scanning the entire home page within the demo Svelte web application in this tutorial, nine issues with different severity levels were identified as shown in the image below:
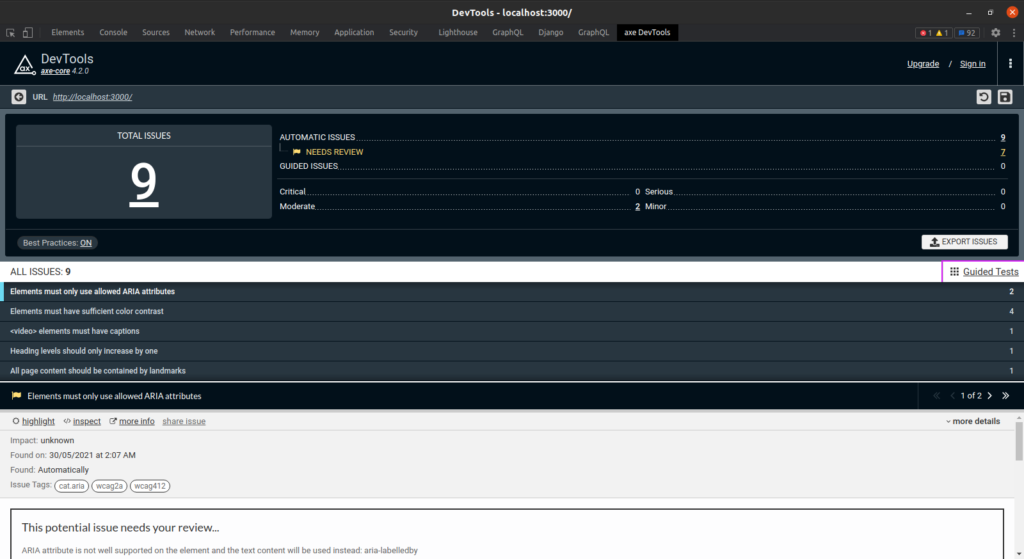
In the image above, you can see the total amount of issues identified with respective severity levels. Also, the axe DevTools provides a breakdown of each identified issue, providing links to the accessibility rule impacted by the issue and a recommendation on how to fix it.
Using PA11Y
From the documentation, PA11Y is described as your automated accessibility testing pal that provides the functionality of running a headless accessibility check against a web application either via the command line or Node.js.
Note: You can also configure Pa11y to run accessibility checks using a Puppeteer instance; however, by default, Pa11y works in a headless mode.
Using the following steps below, you will use the Pa11y JavaScript interface to find accessibility issues within the application.
- Execute the command below from a terminal to install the PA11Y package into the project.
npm install pa11y- Create a new file with the name a11y.spec.js in the tests directory. You would configure the PA11y package to use its JavaScript interface for testing your application’s accessibility.
const pa11y = require("pa11y");

 (async function () {
        try {
            const result = await pa11y(process.env.APPLICATION_URL, {
                   includeWarnings: true,
                   level: "error",
                   runners: [
                       "htmlcs"
                   ]
              })

             console.log(result)
           } catch (e) {
               throw new Error(e)
           }
   } )();
Going through the code block above, you would notice the following things about how the PA11Y package is used to find accessibility issues within the demo Svelte web application:
- The PA11Y interface is being used within a try/catch block in an Immediately Invoked Function Expression ( IIFE ). An Immediately Invoked Function Expression is being used to ensure that the checks are performed immediately the test file is executed. Also the async keyword is used with the function to enable the use of the async/await syntax for handling asynchronous operations.
- The interface is given an APPLICATION_URL as the url parameter. This URL points to the default page of the running Svelte application.
Note: Storing the target application’s URL as an environment variable allows the value to be dynamically changed as the need be. For example, within the continuous integration workflow, you might want to check both the local and deployed versions of the application.
Also, the interface is given a second object parameter with the following properties:
- An includeWarnings field used to indicate that accessibility warnings should be included in the generated report.
- A level field indicating the level of error that can fail the test, and lastly a runners array specifying the runners to be used by PA11Y when checking for accessibility.
- In the catch block within the code block above, an error is intentionally thrown to crash and stop the test with an exit code of 1. This is needed when running the tests within a continuous integration flow, as you might want to stop a new deployment of your web app when a new feature contains a serious accessibility error.
Note: When using the htmlcs runner, Pa11y would run an accessibility check using the HTML Code Sniffer WCAG2AAA ruleset standard. You can also change the standard in your check by specifying the standard field in the options object passed to the PA11Y interface as a configuration.
- Next, add the single code line below to the script object within the package.json file to create a command that runs the accessibility tests using the a11y.spec.js file.
"test:a11y": "node tests/a11y.spec.js"To test the new pa11y setup, execute the npm run test:a11y command from a new terminal window. After running the check, an object containing a documentTitle, pageUrl, and issues will be printed out on the console.
Note: The first terminal or command line window that the Svelte server was started on should be left running, as the tests would be run against the running Svelte application.
Execute the npm run test:a11y command from a new terminal to view ach identified accessibility issue would be added as an object to issues array within the parent object printed out to the console as shown below:
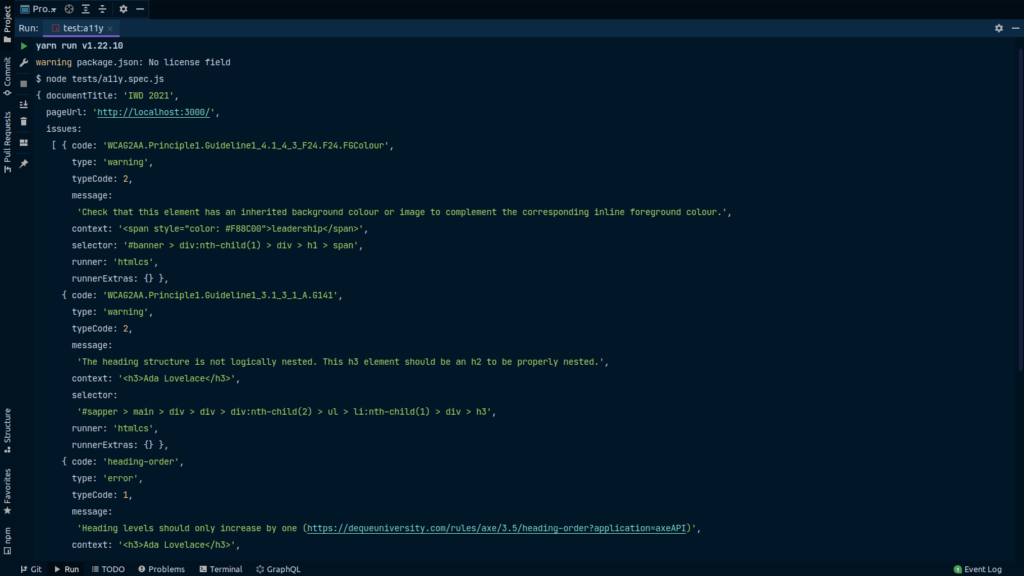
From the console output shown in the image above, you would observe that the issues identified are the same as the ones identified by the axe DevTools extension.
At this point, we have set up an accessibility testing workflow. Now we can focus on fixing the following identified issues.
This error object has a message field value of Heading levels that should only increase by one and the context field of <h3>Ada Lovelace</h3> indicating it is identified in the card.svelte component.
Going through the recommendation link attached to the error message, you would understand that this error message is triggered due to an incorrect ordering of the Heading tags on the page. An h3 tag was used in the card component to display the heroine’s name. Although this doesn't break the code syntax, it affects the page hierarchy and structure.
To fix this error, open the card.svelte component file in your preferred code editor and change the Heading ( h3 ) tag to a paragraph ( p ) with a name class to style the tag as done in the code snippet below:
<div style="margin: 0 4rem;">
    <div class="align-center">
        <img alt={data.name} class="img" src={data.img_uri}/>
    </div>
    <br/>
    <h3> {data.name}</h3>
    <p> {data.description} </p>
    <br/>

    <div class={"align-center"}>
      <button on:click={() => handleRouting(data.name)} class="custom-btn">
            Read Biography
      </button>
    </div>
</div>
Running the yarn test:a11y command again, you would observe the header-order error is gone, indicating it has been resolved.
This error object has a type code of 2 and a message field with the value Check that this element has an inherited background color or image to complement the corresponding inline foreground color and a context field of <span style="color: #F88C00">leadership</span> indicating it was identified in the text-color styling property applied to the span tag in the banner component.
Although the text-color applied might seem appealing to some users, it has an effect on how the content is displayed for visually impaired users. Individuals with visual impairments such as color blindness often configure their browsers to override certain colors that they can't see. However, with the text-color applied to the span tag, the browser cannot perform this functionality.
To fix this error you can remove the text-color style property applied to the span tag in the banner.svelte file. The other option is to replace the span tag with a bold ( b ) tag to lay emphasis on the leadership text as shown in the code snippet below:
<h1 class="banner-title">
Women in <b>leadership</b>
<br /> Achieving an equal future <br />
in a COVID-19 world.
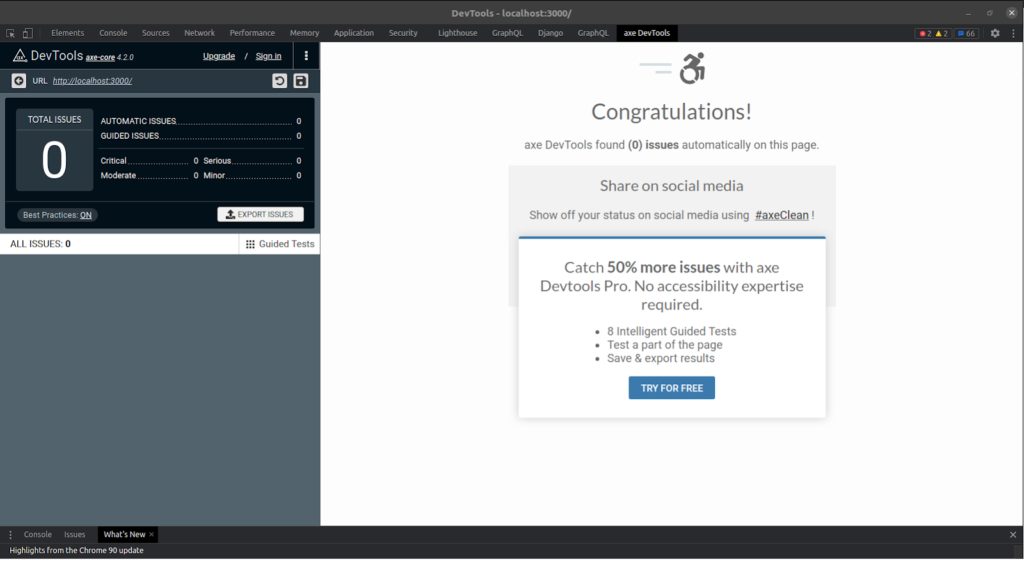
</h1>Running the yarn test:a11y command again, you would observe that the issues array printed out on the terminal is empty, indicating that no accessibility issue was found in the scanned page. Running a check on the page using the axe-core DevTools also shows that all previously identified issues have been fixed.
At this point, we have fixed all identified accessibility issues within the demo web application.
To ensure that your application maintains a high accessibility standard as it grows, it is advised to include the check for accessibility among the jobs executed in your continuous integration workflow.
Accessibility Checks in a Continuous Integration Workflow
GitHub Actions enables you to create a custom software development life-cycle workflow directly in your project contained in a GitHub repository. Through the configuration file, the action workflow can be configured to execute based on a defined event.
For the demo web application, you would want the accessibility test to be executed against all new code updates pushed to the project’s repository on GitHub either in a pull request or directly to the main branch.
The following steps outline how to do this:
- Create a .github directory in the root directory, then create a ci.yml file in the new directory.
- Add the content of the code snippet below into the ci.yml file you created.
name: adeva-a11y-app Accessibility Test
on: [pull_request]
jobs:
  build:
    runs-on: ubuntu-latest
    steps:
      - name: Install Node JS ${{ matrix.node-version }}
        uses: actions/setup-node@v2
        with:
          node-version: ${{ matrix.node-version }}

      - uses: actions/checkout@v1
      - name: Install application dependencies
        run: npm install

      - name: Test local application accessibility
        run: yarn dev & sleep 10 & yarn test:a11y

      - name: Checkout generated files
        uses: actions/checkout@v1
In the workflow file above, we have the following three jobs executed each time a new commit is pushed to a branch in a pull request:
- Using the actions/checkout@v2 action, Node.js is installed into the running workflow build. Installing Node.js makes it possible to run Node.js applications within the build through the use of the npm or yarn command.
- Using the installed Node.js action, the next job’s command installs all dependencies listed in the package.json file within the project. Installing the project dependencies makes it possible to run the application for testing with the workflow instance.
- The third job’s command would start the web application and also run the accessibility test using the yarn test:a11y command. If a new update to the web application contains an accessibility issue, the check would fail and stop the job.
To execute the new workflow, push a new change to your fork of the demo web application repository. After pushing the changes, a new build would be started and you can view the results from the Actions tab on GitHub as shown below:
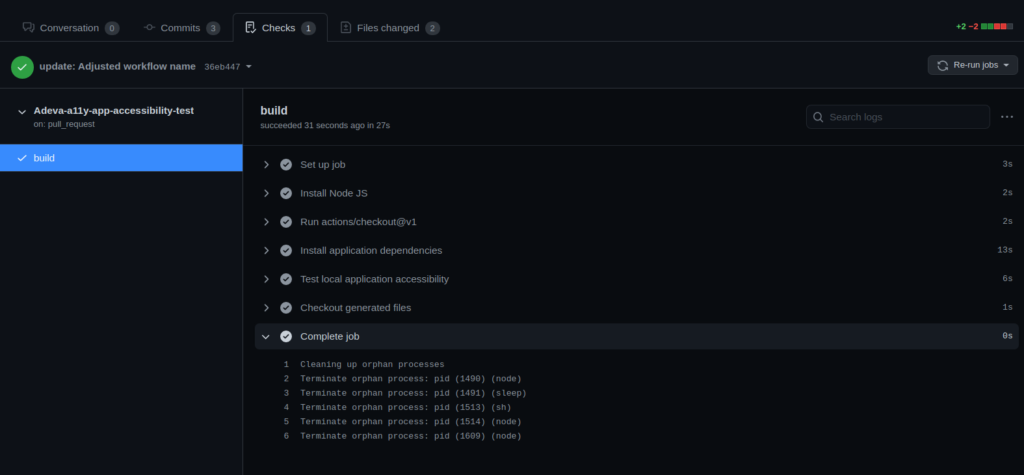
The image above shows all automated checks specified in the ci.yml workflow file passing. This is due to the previous accessibility fixes that you did in the svelte application.
With this automated workflow setup, you can be assured that your application would have some level of accessibility. However, you need to remember maintaining an accessible web application is a continuous process, hence you should often check if your web application maintains an accessible standard.
You can also increase the rules used by PA11Y by adjusting the standard field within the configuration passed to the PA11Y interface or adding more runners to PA11Y.
Conclusion
Within this article, you learned about Web Accessibility with a scenario where accessibility was needed by an application’s user.
Using the browser-based axe-core DevTools extension, you scanned a pre-built Svelte demo application for accessibility issues. After fixing the issues, you set up an automated accessibility testing process using PA11Y and GitHub Actions.
For further reading, I would recommend going through the documentation to familiarize yourself with various PA11Y configuration options. This article written by Ire Aderinokun also explains more details about PA11Y and how you can configure it via a JSON file.
